Technical Application Note 008
Installation of ANPR server and camera setup on a Raspberry PI
| Revision: | 4.8.1 |
|---|---|
| Date: | 2024-03-06 |
| Contact: | support@carrida-technologies.com |
| Copyright: | 2017-2023 CARRIDA Technologies GmbH, Ettlingen, Germany |
| Author: | CARRIDA |


Table of Contents
1 Introduction
This application note describes how the CARRIDA ANPR server is installed and configured for external cameras on a Raspberry Pi system.
This application note is valid for Raspberries, which use the Raspbian or Ubuntu operating system.
2 Download and Installation of the Installer
Download the zipped installer from following link:
https://carrida-technologies.com/download/carrida_cam_4_5/carrida-4_5_1-raspi-full.zip
Switch to the Download folder, unzip the installer and start the bash script with the following command:
sudo sh ./carrida.sh
Note that he installation could take up to the 5 minutes.
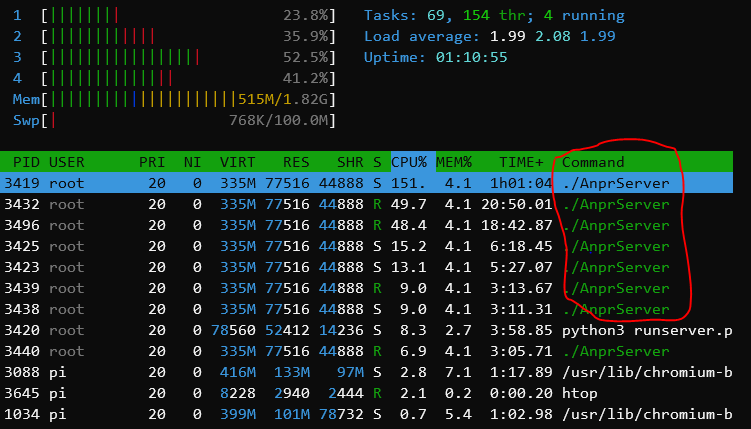
After completion of the installation script, the server should be running in the background. You can check with the Linux tool*top* or with the more advanced htop command, if the AnprServer process is running.
The UI starts to listen on following address on the Raspberry:
*http://[raspi_ip]/* or *http://127.0.0.1/* on the raspberry pi that the server is running on.

The Login Screen
3 Camera Configuration
The CARRIDA software on the Raspberry can be configured to use different camera types as image source. Some of the cameras can be setup using the CARRIDA camera web interface, some camera types need to be setup manually.
The ANPR server scans for USB cameras at each startup. If you attach a new camera to the system, either reboot it, or restart the server from the WebGUI.
The camera types which are supported by the standard CARRIDA installation are:
- USB cameras
USB cameras can be connected to the RasPi USB port. Depending on the manufacturer and availability of a driver in Raspbian, the camera can be detected by CARRIDA using the built in OpenCV framework.
Note: Some USB cameras may be detected with V4L2 driver as well.
- IP cameras/RTSP streams
If you attach an IP camera with RTSP streaming capability to the Raspi using the network interface, it can be detected by CARRIDA using the built in OpenCV framework.
RTSP cameras can be configured in the web GUI, see below.
- MIPI/V4L2 cameras (Note: This section is intended for expert users only)
MIPI cameras are generally recognized as V4L2 cameras in CARRIDA. This camera type needs to be configured manually in the anpr.ini file which is used as low level server configuration file.
By default, after installation, the server starts running with the V4L2 camera with id 0, if there is such a camera connected to the Raspberry PI. You can change this behavior by manually editing the anpr.ini file.
Note
 If the ANPR server cannot read a valid image from the camera source, an empty
live view with an error message is displayed.
If the ANPR server cannot read a valid image from the camera source, an empty
live view with an error message is displayed.
3.1 Configuring a camera using the WebGUI
If you have attached a USB camera or streaming camera to the RasPi, you can configure it using the CARRIDA web user interface. In the Configuration screen in the web interface, the tab Cameras is used for the camera configuration, as shown below. The type of camera (USB, V4L2, or RTSP) as well as the camera interface id below is displayed:
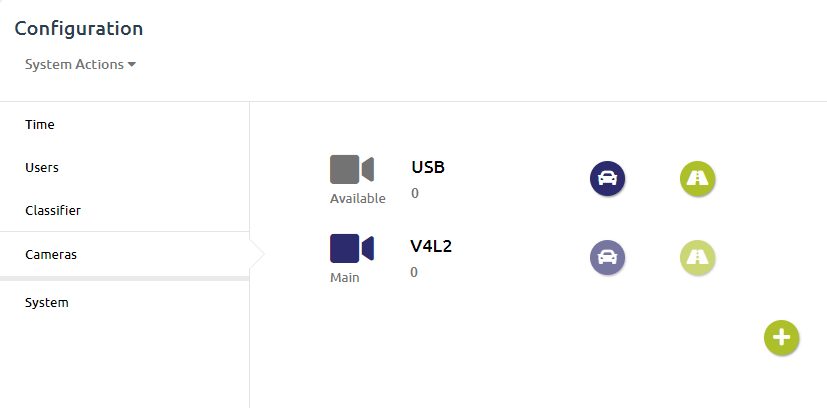
The camera configuration screen.
Each of the displayed cameras from the list can be selected as main (the round vehicle symbol) or overview camera (the round highway symbol). In the current CARRIDA version, only the main camera can be used for ANPR.
The green button at the lower right is used to add a new network camera. For its configuration you need to know the network address as well as login and password, if required:
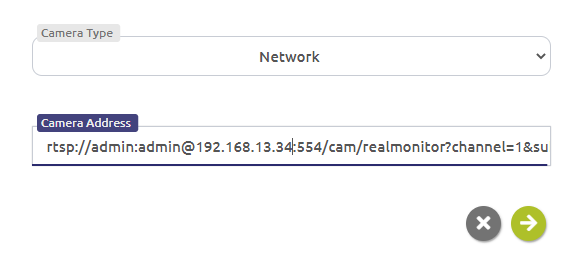
The network camera configuration screen.
3.2 Camera definition in the anpr.ini file (Note: This section is intended for expert users only)
If you have attached a camera type which is only recognized as V4L2 device, it needs to be configured directly in the anpr.ini file of the ANPR server. Note that MIPI cameras are also recognized as V4L2 cameras by the Raspberry.
Use the following procedure to add a V4L2 camera:
Open as su the file /srv/carrida/anprServer/anpr.ini.
Set cam_type parameter from the [CAMERA] section to V4L2.
Set cam_name parameter from the same section to cam#, where # should be replaced with the index of MIPI or V4L2 camera (typically the index will be 0).The following screenshot gives an example for the configuration of a camera with index 0:
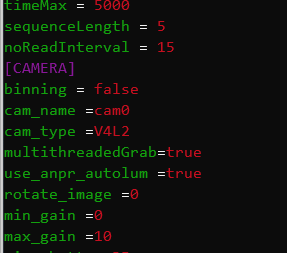
Note: All other parameters in the [Camera] Section should be left untouched!
Restart the AnprServer either in webGUI (Configuration > SystemActions > Restart ANPR), or manually in the terminal with the following command:
sudo systemctl restart anprServer