Plate-i/Plate-i Dome User Manual
| Revision: | 4.9.0 |
|---|---|
| Date: | 2024-03-15 |
| Contact: | support@carrida-technologies.com |
| Copyright: | 2017-2024 CARRIDA Technologies GmbH, Ettlingen, Germany |
| Author: | CARRIDA Technologies |


For a quick start and a first installation guide of Plate-i Dome please use the Plate-i Dome Quickstart Guide
For a quick start and a first installation guide of Plate-i Basic please use the Plate-i Basic Quickstart Guide
1 Introduction
The Plate-i Camera combines an imaging and processing device with the CARRIDA software engine, resulting in a smart and compact license plate reading sensor.
Plate-i offers an intuitive user interface, a powerful OCR engine, and a set of flexible IO protocols for communication with the outside world. Any PC or mobile device can access the camera configuration locally or through a remote network connection using a web browser.
 |
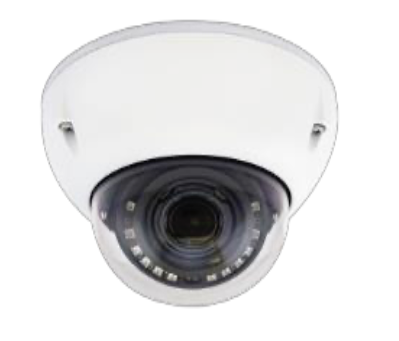 |
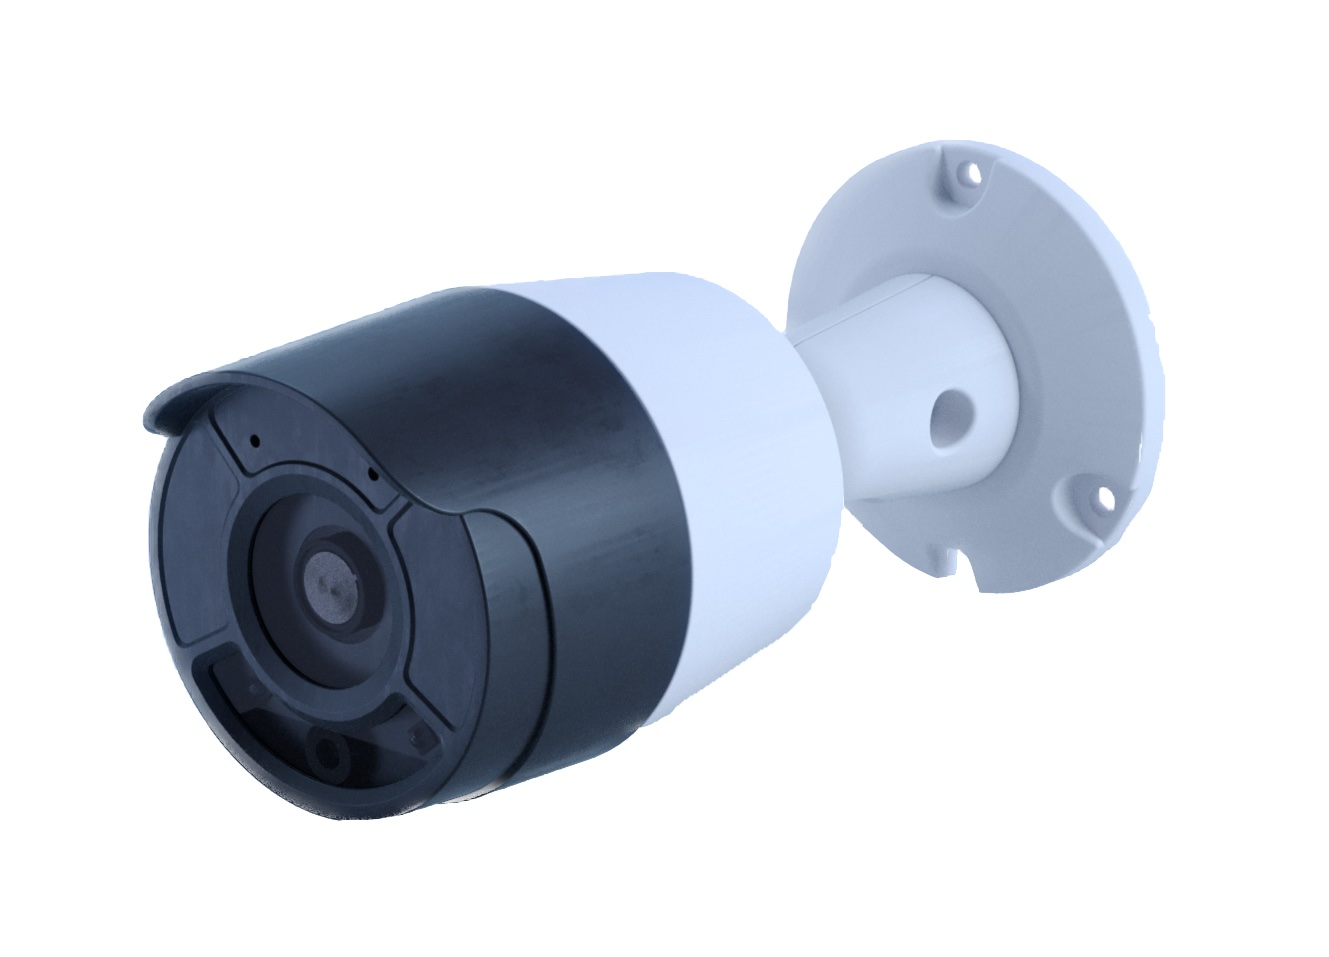
This manual covers the Plate-i as well as the Plate-i Dome camera models. Both cameras operate identical, except for the manual focus and manual zoom option on the Plate-i Dome model. These differences are covered in Section Camera.
Typical applications of the Plate-i Camera include:
- Access control for parking lot management.
- Automatic barrier opening.
- Vehicle ticketing and vehicle management.
- Vehicle counting.
- Law enforcement applications.
- Traffic planning (count vehicles, map traffic to geographic regions).
- Traffic flow monitoring.
Plate-i offers the following features and benefits:
- Easy to configure.
- Supports license plates with two rows.
- Supports license plates with stacked characters.
- Robust against illumination, contrast, noise, and rotation.
- Support for State/Country recognition.
- Model&Make recognition on supported systems.
- Vehicle type recognition on supported systems.
- Very flexible configuration.
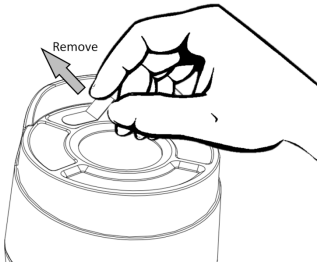
1.1 Before you install the Plate-i Camera
Before that camera is installed, remove the protection cover of the external light sensor at the front of the Plate-i camera.
Note: The Plate-i Dome does not have a protection cover for the light sensor.
2 Accessing the Plate-i Camera
Note
 The default factory reset IP address of the camera is 192.168.0.11
2.1 Secure communication with the Plate-i Camera
Secure encrypted communication with the camera is possible using the HTTPS protocol.This feature enables encryption of all communication for log in, data transfers with the user interface (including login) and all REST API calls.
If SSL is enabled on the camera, HTTP requests are automatically redirected to the HTTPS communication protocol.
When DHCP is enabled, the camera will have a dynamic IP address. In this case the Camera ClientTool can be used to detect a camera in the network. More information on how to use the ClientTool can be found in CARRIDA CameraTool .
2.2 Logging into the camera
The Plate-i camera user interface gives you access to control all features of the Plate-i edge device. You can use a standard web browser on a PC, tablet, or phone to access the camera configuration, even remote access over the internet or VPN connection is possible.
Before the camera can be accessed from a web browser, you have to
- know its network address - see Quickstart Guide for your camera on how to find out its IP address.
- know and provide your credentials when logging into the device.
Note
The default IP address of the camera (if not set to DHCP) is 192.168.0.11.
The Plate-i user interface offers several levels of access control with different sets of permissions. Only the super user and administrator are allowed to modify all settings and parameters of the camera, basic users are only allowed to modify a limited number of settings.
The username and password are typically provided by the administrator of the camera(s), but a set of default users is stored in the camera.
Factory login settings (login_name/the_password) are:
- SuperUser (su/car0000rida)
- Access to all settings. May delete admin users, has access to interface design settings. We recommend to use this login only if absolutely necessary.
- Administrator (admin/secret)
- Access to all settings. Has the authority to add and delete other users.
- Basic user (user/simple)
- Access to the most common settings, no system critical parameters may be changed.
- Setup: (setup/setup)
- Access to the live view and reading results. May change the ROI and classifier settings.
- Viewer (viewer/pass)
- Access to the live view and reading results. Not allowed to change any settings.
Note
We strongly recommend to change the default passwords for the user accounts
before or during the installation of a new camera.
2.3 Camera Video Streaming
The Plate-i cameras can stream a live image to your browser parallel to ALPR detection. This live stream can be accessed by using the following address:
rtsp://carrida:car.cam1.rida@<network_address>:554/carrida_live
2.4 CARRIDA Live View / Home Page
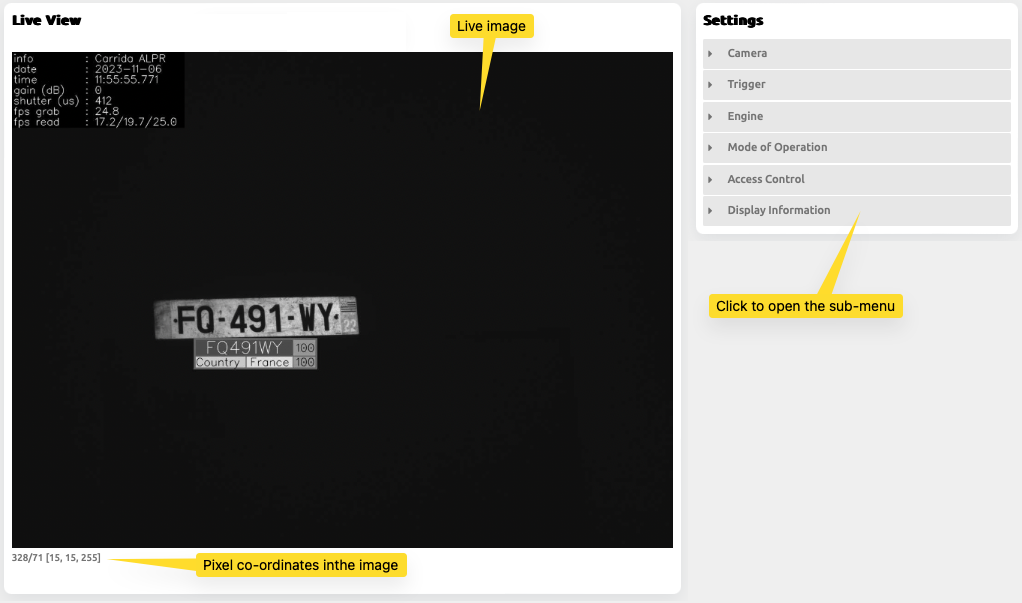
After successfully logging into the camera, you get directed to its Live View page. Its main purpose is to verify that the camera is operating properly.
The page shows you a live stream, an overview of the general setup and recent detection history, and some additional statistics.
The left sidebar on this page and throughout the user interface, gives you access to all other available menu pages of the camera.
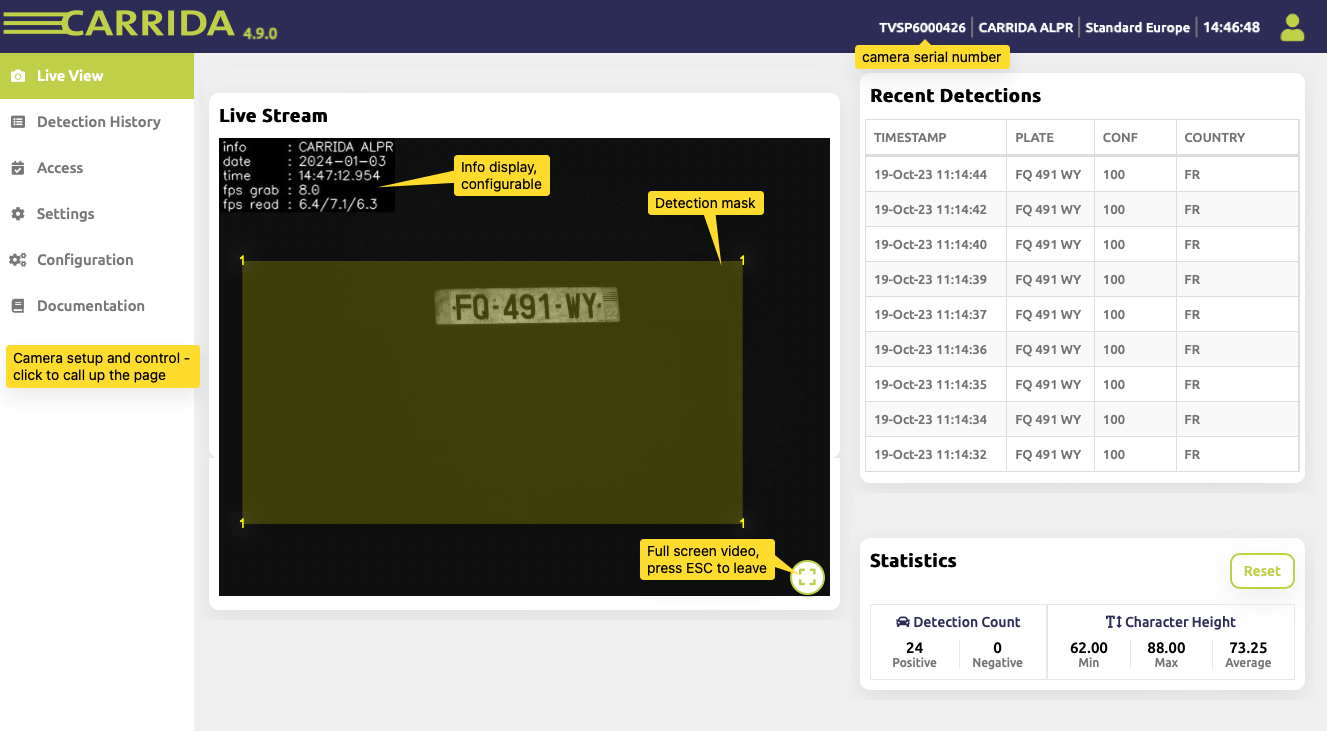
2.5 Camera Information
The top of the browser window always displays the most important camera configuration settings like the currently activated ALPR region, the current time, and the language setting.

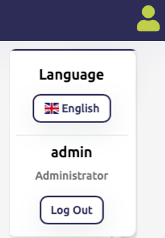
2.6 The User Menu
In the upper right corner of the website, page you can always find the User menu which allows you to easily switch between user profiles and languages. For example, you can switch between a regular user and the administrator here - The logout button brings you back to the Login Dialog of the camera so that you can login with different user credentials.
The Language selection button located in the user menu is used to change the language of the web interface. The default language is English. In addition, the camera offers German and French.
2.7 Live Image
A video stream from the camera is displayed in the Live Stream section. The regions of interest are shown as transparent yellow polygons, reading results are superimposed on the image over each detected license plate.
If the display of additional information has been selected in the Settings menu, e.g. info, date and time, it will also be displayed in one of the image corners.
The details of how to configure the graphical overlays can be found in Section Display Information.
It is possible to display the video in full-screen mode by clicking on the round button in the lower right corner of the live image. You can leave the full-screen mode by pressing the ESC (escape) key.
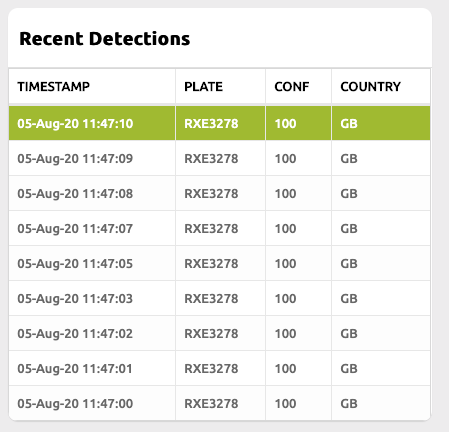
2.8 Recent Detections
The most recent detection results are listed in the table at the upper right hand side. This table is constantly updated with each new detection. Note that the animation of the detection update can be turned on/off in the Settings page.
2.9 Detection Statistics
From the Live View you can get an overview of some detection statistics.The camera collects information about
- minimum detected character sizes, (use for engine setup)
- maximum character sizes, (use for engine setup)
- accepted detections,
- invalid detections (e.g. vehicles moving in the wrong direction).
The numbers are displayed in the lower right area of the Live Result page. The reset button sets all counts to 0.
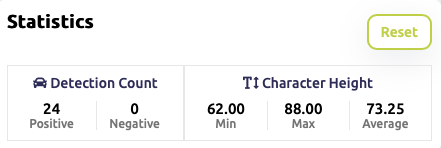
You can use the character size information shown here to optimally configure the Plate-i engine in the Settings page.
The Detection Count shows the number of license plates which have been moving in accepted and not accepted directions according to the setup of each ROI. Counts are reset after each restart of the camera or server.
3 Detection History Page
The Detection History page allows you to view and search all detection results (including images) in a compact tabular view. The number of entries which can be displayed is unlimited for all practical purposes.
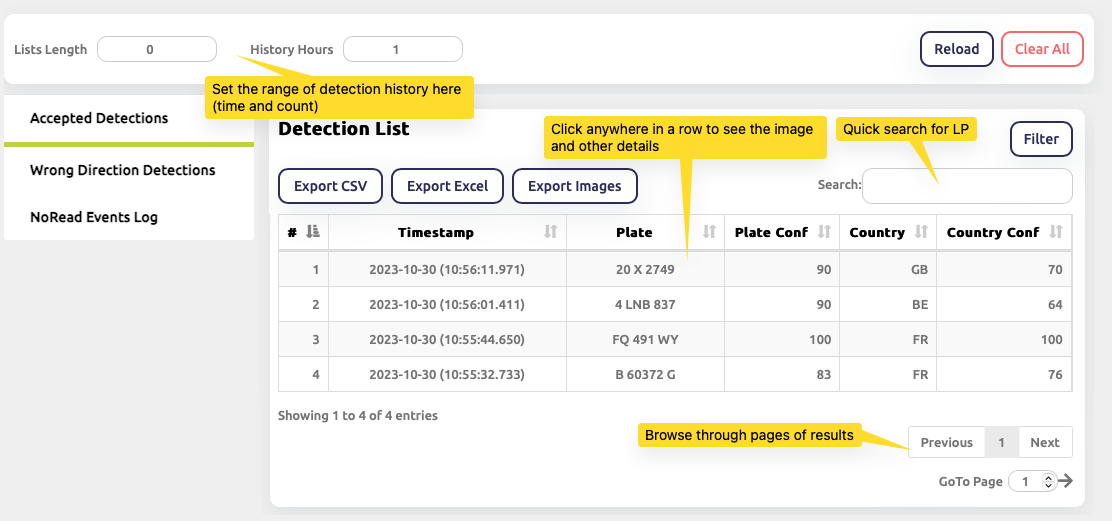
The number of results which are stored on the camera is configurable through the History List Length (max 10000 entries) and the History Hour (max 10000 hours) input fields at the top of the page. When either the defined time limit or the maximum number of stored results is reached, the oldest results will be discarded and overwritten.
Note
History List Length, History hour, and NoRead Log Length are
set to 0 by default.
The Detection History page maintains several different tesult tables, based on the type of event which created an entry:
- Accepted Detections
- Lists all the plates which were detected in an ROI and which are accepted according to the ROI configuration.
- Wrong Direction Detections
- Lists all the plates which were detected, but were moving in the wrong direction according to the ROI configuration.
- NoRead Events Log
- All NoRead events since the camera was started. These events are generated when the camera is configured for a triggered detection and a timeout occurs within the defined detection time window (see Section Trigger).
3.1 Detection results
The tables for the Accepted Detections and the Wrong Direction Detections consist of:
- A Timestamp with the date and the time when the plate was detected.
- The License plate text.
- The Confidence of the given license plate recognition.
- The detected Country of the vehicle license plate.
- The Confidence of country recognition.
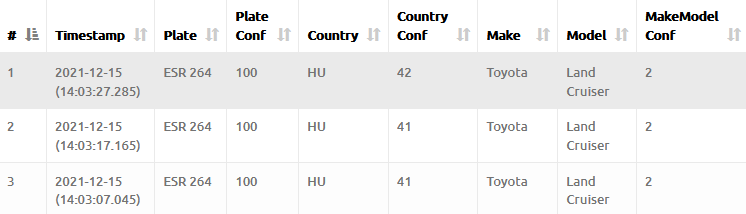
If the classifier on your Plate-i edge device can recognize the Model&Make of a vehicle, or its class, the text result table displays this information in additional columns:
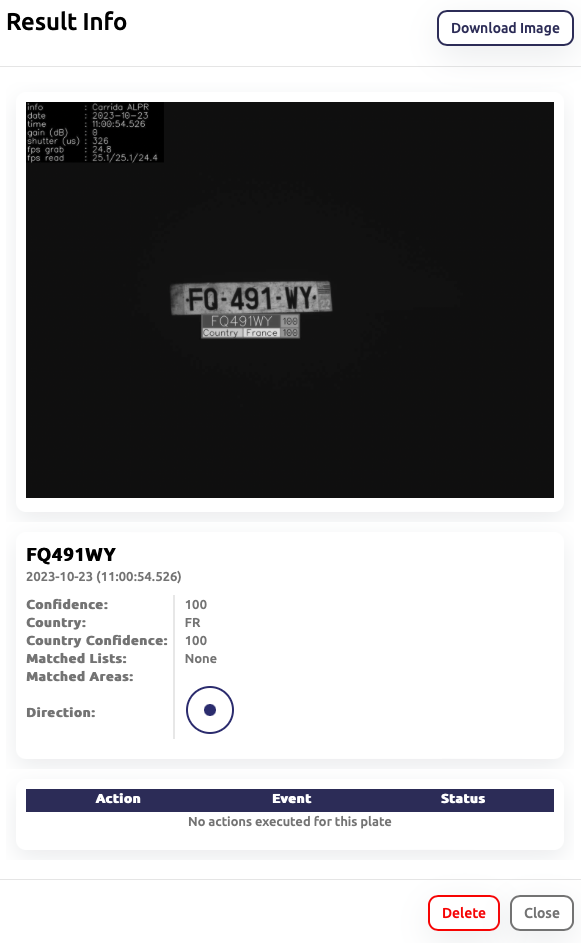
An image of the detection can be recalled by pressing the mouse on a location anywhere within the table entry. The actions and their result states are listed at the bottom, including a visualization of the motion direction of the vehicle.
Download the image to your PC by pressing  .
.
3.2 NoRead events log
The use of the result table for the NoRead events log is very similar to the other two previously mentioned tables. It consists of:
- A Timestamp with the date and the time when the plate was detected.
- The type of Event which was triggered.
- The number of Defined Actions which have been configured for this event.
3.3 Refreshing detection results
The result tables are generated when the Detection Results page is opened, they are not automatically updated - new entries may be created by the camera while you are watching.
To update any table with the latest results, click  .
.
3.4 How to browse the result table
The result tables potentially contains thousands of entries which cannot be displayed at once. If necessary, the results are therefore separated into pages which can be individually loaded from the camera using the navigation buttons.

- Previous or Next buttons switch the page.
- Directly jump to a page of the result table by clicking the page number box.
- Type a page number into the GoTo Page field and click the right arrow.
3.5 Searching a table
To get the most out of the result tables, they are made fully searchable. You can query for detection using any given information like plate number, date, time, or even Model&Make.
The simplest method is to type the text you are looking for (e.g. the license plate string, or only a part of it, or a number) into the search field which is located in the right upper corner of the page.
You can search for multiple strings by separating them with a space in the search field. In this case, all of the strings must be found somewhere in the table entry.
For example, if you type are looking for results which contain the text element BR and the number 80, type 'BR 80' into the search field like shown below. Note that the '80' would be searched for in license plate strings as well as confidence values and other numeric values.

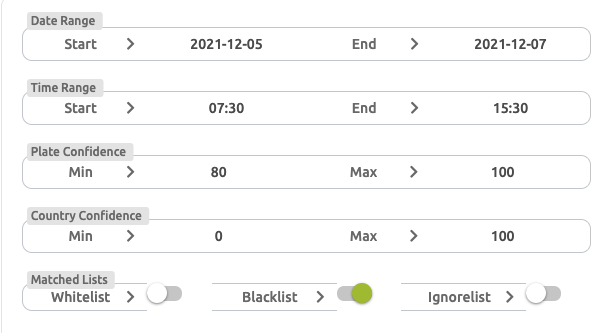
A more detailed search is possible by filtering for specific detection details:
- A Date and Time range,
- Plate confidence,
- State confidence,
- and the list to which it matches.
The filter option dialog opens by clicking  .
.
If you provide only one of the parameters per range field, e.g. only the starting date or the lower confidence value, the opposite parameter is set to a value that maximizes the search range.
| Example: | This example shows you how to combine the text search field and the parameter filter options to look for specific license plates
|
|---|
Pressing again closes the detailed search options.
3.6 Deleting entries
Individual entries of the detection result table, filtered or unfiltered, may be
deleted by clicking on the table entry to show the image. Press the
 at the bottom to remove this entry.
All entries of the text result table can be deleted by pressing
 at the top right of the page.
3.7 Exporting a result table
The content of (the potentially filtered) Accepted Results or Wrong Detection Results tables can be exported from the camera in several different formats. You can choose to export as:
- CSV
(comma separated value) file.
- XLS
file readable by Excel.
- ZIP
archive which contains all images. The naming format of the images is fixed as <timestamp_platestring_confidence_state_confidence.jpg>.
Do not forget to update the table with prior to export.
4 ACCESS Configuration Page
The ACCESS configuration page provides two tabs Actions and Lists, and your configured MQTT servers. It provides the tools to define what the camera has to do when a license plate has been detected. For example, an action could send the image and license plate string to an ftp server when its string has been matched with an entry from the Blacklist.
The following mechanisms are used to setup the camera:
- Events
- are triggered when some pre-configured state change within the camera happens. This can be the detection of a new license plate (LP), not detecting a LP within an externally triggered and timed reading operation, a LP moving in the wrong direction, or a LP with low confidence. Events can trigger actions - this is the basic mechanism used by the camera to do something when a LP has been (or has NOT been) detected. Events may occur in relation to a LP string which is matched in one of the lists maintained by the camera: For example, a detected LP is matched in the Whitelist and thereby triggers some action.
- Lists
- provide the means to define which license plates can trigger actions. The three list categories Whitelist, Blacklist and Ignorelist can each have their own associated actions. The three lists maintained be the camera may be used for arbitrary purposes, they have assigned names for convenience only.
- Actions
tell the camera what to do when a specific event happens. Actions can be triggered by
- general events, e.g. the detection of a new license plate,
- by specific events related to lists,
- or they can be related to external trigger events.
In the general case, any actions may be performed whenever a license plate is being read (Read Action) or NOT being read (NoRead), possibly within a timeout defined by a triggered read. These actions are not related to lists.
In order to trigger actions only for specific license plates, Whitelist match/mismatch, Blacklist match/mismatch and Ignorelist match/ mismatch events may be used to trigger actions. An action will only be performed when a LP text from the list is matched, or to the opposite, when a plate is detected, but not found in the list (mismatch). Actions allow you to make full use of the I/O capabilities of the camera, including the network interface, I/O lines and the internal flash storage.
The camera is configured in three steps, the details are explained in the following sections:
- Optional: Define or import lists of license plates which should be used to match new detections (e.g. define a Whitelist of allowed entries).
- Choose which event triggers an action (e.g. a new LP has been detected).
- Define the type of action which shall be performed (e.g. send the LP text to a server). An arbitrary number of actions may be defined and performed by the camera, but consider that network transfers and store operations may consume a significant amount of CPU time on the camera and may slow down its operation.
4.1 Definition and import of access lists
The three access lists available on the camera allow you to divide license plates into two different categories. The lists may be used for arbitrary purposes, they have assigned names for convenience only. The available Access Lists are:
- Whitelist
- Blacklist
Every time the camera reads a new license plate, it compares the LP string with all entries stored in each list. If an entry matches, and an action for that list has been defined, this action (and possibly more) will be performed.
Likewise, if the newly found license plate does not match and an action is defined for this situation, it will be performed.
Each list may contain an arbitrary number of license plate texts. You can modify lists by
- editing them manually in the web GUI,
- importing them from your PC,
- using the REST API of the edge device to manipulate them.
By choosing one of the sub-menus, you can select which of the lists you want to modify. For each list you can
- add a list entry manually,
- import list entries from a text file stored on your PC,
- export the list as text file,
- delete a list entry,
- clear all entries from this list.
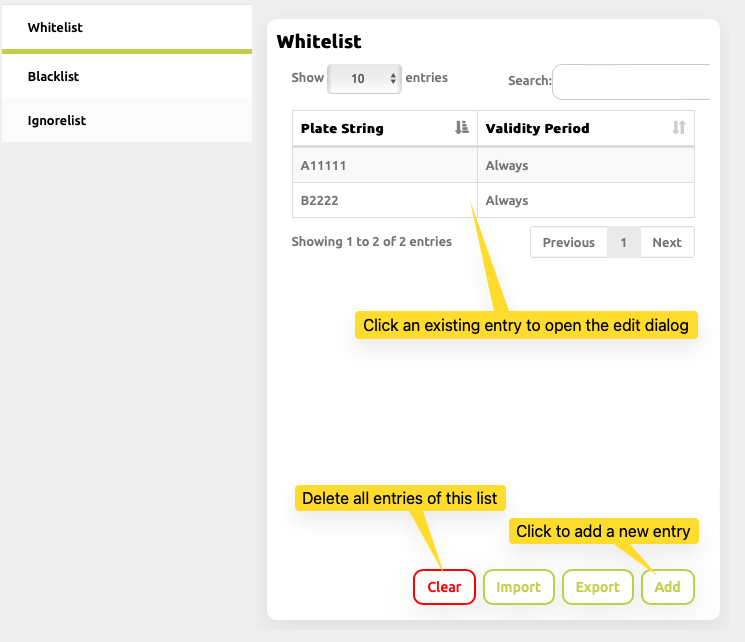
4.2 Manual creation of a list entry
A new list entry can be directly created using a dialog in the camera's
interface. Click on  to open the Add List Entry dialog.
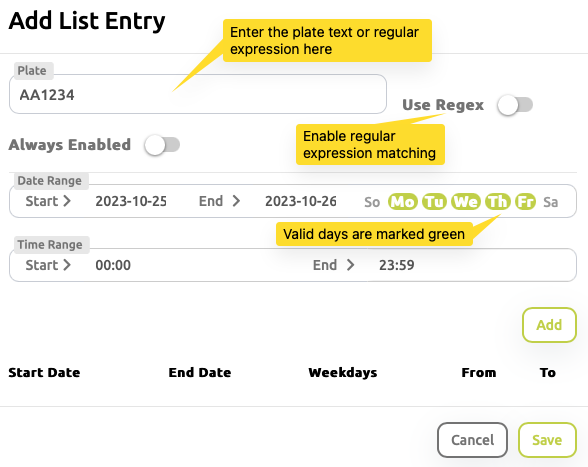
The first entry in the dialog box is the license plate text. Entries may either be defined as full strings, or as patterns which are called regular expressions. With the help of regular expressions you can define text patterns for a set of strings in a compact way. Regular Expressions are explained in detail in Section Regular Expressions at the end of this manual.
| Example: | You can easily write a regular expression to match all license plates of company XYZ in Berlin, which have the form BXY + 3 digit number, by using the regular expression
This will match any license plate which starts with BXYZ and ends with a 3 digit number, e.g. BXYZ123. |
|---|
Note
Depending on whether Plate-i is configured to evaluate and use white spaces
(see Section Whitespace Matching), the text field used to manually enter
the license plate accepts a blank character ' ', or not.
Turn the Use Regex switch ON, if the text for the license plate string shall be interpreted as regular expression.

When Always enabled is turned OFF, time and date limits apply to the validity of the defined license plates. Those restrictions can be defined through
- start and end time of the day,
- the start and end date,
- individual valid days of the week marked as So, Mo, Tu, We, Th, Fr, Sa.
Note that more than one time/date range is possible per license plate entry, e.g. a time slot in the morning and a time slot in the afternoon.
A new list entry is preset with a time range from 00:00 to 23:59 (the whole day), and Monday to Friday, for the current day.
In the example in the dialog shown above, Mo-Fr is checked green, meaning that the LP is valid on any working day between the set dates.
When Always enabled is turned ON, a match will not be restricted to a specific time or date range, the LP is always valid.
After finishing the list entry details, click to save the time/date
details for this plate. If necessary, you can add more than one validity range
for this license plate and also add it.
Click  to add the new plate entry to this list and close the
dialog.
to add the new plate entry to this list and close the
dialog.
Pressing removes this plate entry from the current list and
closes the dialog.
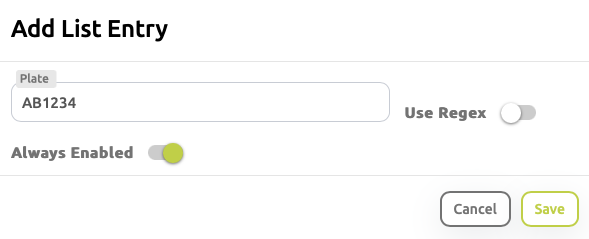
4.3 Modifying and removing an existing list entry
Click on an existing list entry to open the edit dialog for this plate. Here
you can change its parameters, or by clicking , remove it
from the list.
4.4 Import of list files into the camera
If a larger number of license plates needs to be maintained, it is more convenient to import a formatted text file which contains all the license plate data and associated date/time range definitions. This file can be created automatically from a database or other sources of information.
In order to upload a properly formatted text file, following the steps below:
- Create the text file according to the Formatting rules for external files described in the next section.
- Select the list you want to import to.
- Choose the text file from Step 1 above.
- During the import of the text file, all entries are checked for validity, only valid entries will be imported and used.
- Choose whether an uploaded list replaces the current list in the camera, or if it is being appended to it.
4.4.1 Formatting rules for external files
External text files with license plate definitions have to be formatted properly so that the camera can parse their content. The following rules apply:
Every list entry must be placed in a single, separate line without blank spaces.
Each line is formatted in the order license plate; date window(s); or license plate; date window(s); time slot(s)
Time slot definitions are optional, but if given, they must be defined for every date window.
Plate number, date and time must be separated with semicolons (;).
When listing multiple dates/times, separate them with a comma (,).
Date format: YYYYMMDD-YYYYMMDD, with no space between the numbers.
Time format: HH:MM-HH:MM(xxxxxxx). Time is always defined in combination with the date and a list of seven 0/1 flags for invalid/valid days.
Days of the week are represented with zeros and ones (0-not active, 1-active) written inside the parenthesis starting with Sunday, ending with Saturday. For example, in 0111110 the non-active days are Sunday and Saturday.
If days of week are used, they must be specified together with a time range. If the whole day shall be valid, use 00:00-23:59(0..1) as pattern.
E.g. 00:00-23:59(0111110) to specify weekdays, 24 hrs.
The number of dates set must be equal to the number of time ranges. If there are more dates than time restrictions (and vice versa), the definition of this entry will be regarded as invalid.
- Example:
W223344;20230101-20230125;08:00-12:00(0111110):
an action will be taken if the vehicle
- with plate number W223344 is detected
- from 01.01.2023 until 25.01.2023,
- between 08:00 and 12:00 on
- any day of the week, except Saturday and Sunday.
More examples:
| Entry | Description | |
| Plate number | W223344 | Actions will be taken when a vehicle with this number plate is detected. |
| Plate number and date | W223344;20170925-20170926 W223344;20170925-20170926,...,20170529-20170629 |
Actions will be taken if the plate is detected on a date inside set limitations (20170926<=[current date]<=20170925). Multiple dates can be set, separated by a comma, defined in one line, without blanks. |
Plate number, date and time |
W223344;20170925-20170925;03:00-04:00(0111110) W23344;20170925-20170925,201701012-20171112,...;03:00-04:00(0111110),05:00-06:00(0111110 ),... |
Time must be set in combination with the date. When there are multiple dates, if time is set for one date it must be defined for all dates. In this example two dates with their respective times are set where date(1) 20170925-20170925 is combined with time(1) 03:00-04:00, and date(2) 20170112-20171112 is combined with time(2) 05:00-06:00. |
Note
4.4.2 Regular Expressions in Plate Text
Regular expressions are used to conveniently define patterns for license plates or groups of license plate strings. You can use regular expression when you enter list entries manually, or in text files which you import. A complete description of the regular expression syntax which Plate-i supports can be found in Regular Expressions at the end of this manual.
Regular expressions can be used in the dialog for list entry of the camera, or in the imported text files:
- On manual entry a list entry, turn the regular expression switch on.
- In the import text file a license plate regular expression must be preceded with a "!" character, e.g. !B*.
| Example: | To match any license plate string of at least length 1: .+ Match license plate strings which consist of digits only: [0-9]+ Match all taxis, under the assumption that taxis have a license plate string that ends with TX: .+TX Match all license plates that start with a letter and end with a digit: [A-Z]+.*[0-9]+ Match all license plates from the Plate-i company, assuming that their license plates consist of a CAR string and a following 3 number digit (like CAR001):
CAR[0-9]{3}
|
|---|
4.5 Actions
In order to let the camera interact with your systems, it is configured to perform actions. Those actions, like the transmission of a LP text to a server, are in turn triggered by events. An event may for example be the detection of a new license plate.
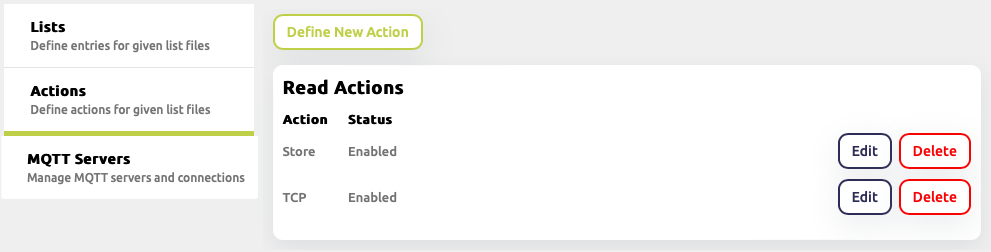
4.6 Adding Actions
A new action is added by pressing  in the
Access-Actions sub-menu. This menu also shows you a list of previously defined
actions which you can edit or delete:
in the
Access-Actions sub-menu. This menu also shows you a list of previously defined
actions which you can edit or delete:
To setup an action
Press
to get to the setup dialog.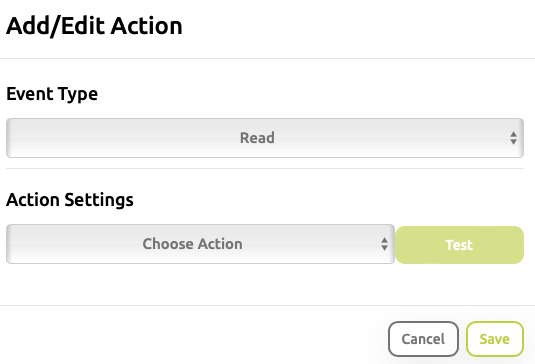
Choose the event type which should trigger the action.
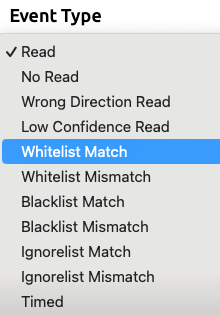
- Read events
occur when the camera detects and reads any license plate.
- NoRead events
occur when NO plates are detected in a triggered reading mode. The use of external triggers is explained in detail in Section Trigger.
- Wrong direction read events
occur when a new license plate is detected, but it's moving in a direction that is not within the allowed direction range, i.e. it moves the wrong way.
- LCR events
a Low Confidence Read event is created when the plate is read, but the confidence level is lower than set in the parameter Settings-Access control-Limit of Low Conf. This type of event is mostly used for debugging and testing.
- Whitelist match, Blacklist match
if the license plate is found in one of those lists.
- Whitelist mismatch, Blacklist mismatch
if the license plate is NOT found in one of those lists.
- Ignorelist match (only available on selected camera models)
if the license plate is found in one of those lists.
- Ignorelist mismatch (only available on selected camera models)
if the license plate is NOT found in one of those lists.
- Timed Actions
are triggered by a timer in regular intervals. For example, the camera can be configured to send a live image to a server once every hour.
- Select the action type and configure it in the dialog which adapts
according to the type which you have selected:
- Ftp Upload
Create a new file from the reading result and transfer it over ftp.
- Ftp Database
Update a database file on an ftp server with the new reading.
- Store
Save the current image in a specified location on the camera.
- Digital out (only available on selected camera models)
Set a digital output line of the camera for a specified time.
- Serial (only available on selected camera models)
Format and send a message over the serial port of the camera.
- TCP
Format and send a TCP message.
- HTTP
Format and perform a request on a specified HTTP server.
- HMACHTTP (only available on selected camera models)
Use the HMAC protocol to allow secure communication with a server.
- MQTT
Publish a message to an MQTT server.
- LEDBlink (only available on selected camera models)
Activate the LEDs on the camera for a specified time interval.
The Add/Edit Action Dialog changes dynamically based on the type of action you want to define. The next section describes each of the action types and how it is to be configured.
4.7 Actions and their definition
Each action must be enabled by sliding the Enable button to the right,
 , if it shall be active.
Actions may be valid on one of the defined ROIs (see Section
ANPR Region Of Interest) or on all ROIs. Use the pull down selector
 to specify which of the areas shall trigger the action.
Finally, before you save an action to the camera, you can test it by
pressing  .
.
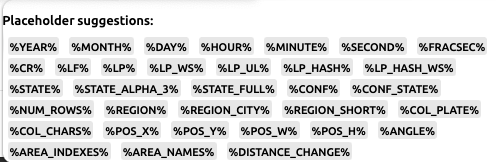
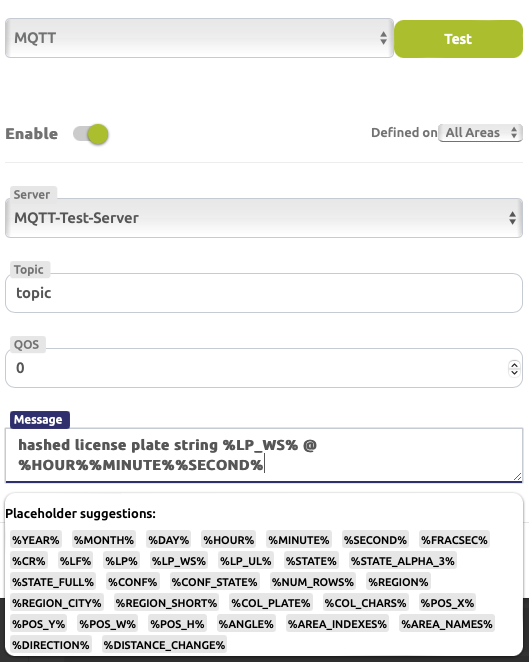
4.7.1 Placeholders - dynamic text elements
All actions which create messages or files can use placeholders for actual values of an event. For example, an action may create a filename which uses the actual license plate text and/or the current date and time. This feature allows you to create dynamic actions, which are much more useful and give you more flexibility for the integration of the camera into your environment.
Placeholders have the form %placeholder-name% - this text will be substituted by the actual dynamic element information when the action is performed.
| Example: | A placeholder for the license plate is %LP%, for the date is %DAY% %MONTH% %YEAR%, level of confidence for plate recognition is %CONF%. The camera detected a vehicle with number plate W223344 on the 03.08.2023, with confidence 98%. An action definition of Detected %LP%(%CONF%) on %DAY%/%MONTH%/%YEAR%. could result in the actual created message text Detected W223344(98) on 03/08/2023. |
|---|
Some special characters are also represented as placeholders. If you need them in action texts, you can write them literally in the action text, or optionally use their placeholder representation:
,          or   %COMMA%
( )        or   %BR_ON%       %BR_OFF%
[ ]        or   %SQ_BR_ON%    %SQ_BR_OFF%
=          or   %EQUALS%
&          or   %AND%
You always have to use placeholders for carriage return and linefeed symbols:
<CR, ASCII code 13>: %CR%

<LF, ASCII code 10>: %LF%
The current list of available placeholders is shown when you edit a filename dialog, note that not all placeholders below are supported on all camera models:
4.7.2 Ftp Upload
Used this action to transfer image files of detected plates to a remote ftp server.
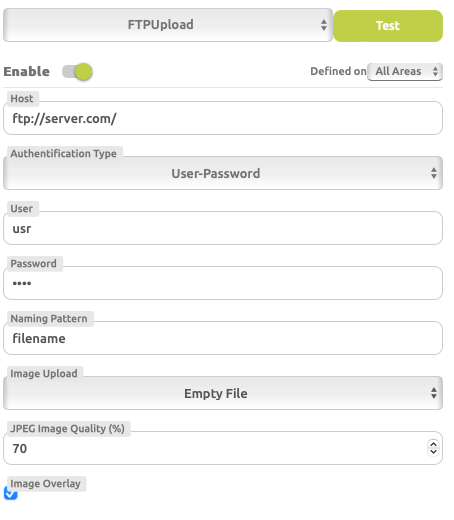
Enter the Host ftp servers IP address in the form of (s)ftp://192.168.3.127/[...].
As authentication method you may choose between
- User/Password Authentication
Username and Password of the ftp server should be written in the form of [username]:[password].
Example: for the username "user123" with password "pass123" the correct form to enter is: user123:pass123.
- Private Key Authentication
Select a private key file which is to be used for authentication.

The Naming pattern specifies the filename to be created on the ftp server. You can use any of the CARRIDA placeholders to generate a dynamic filename:
With a selection of the Image Upload menu you can select how images are cropped around the detected license plate:
- Empty file
- Create and empty file only, the image will be empty.
- Full image
- Transfer the whole camera image.
- LP Image
- Transfer only the image area which contains the license plate.
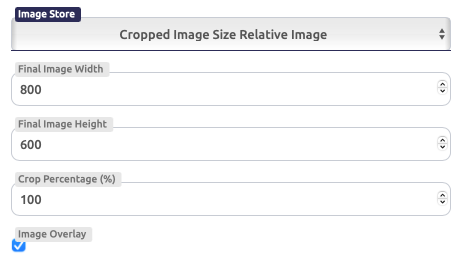
- Cropped Image Size Relative Image
The image is centered at the detected license plate, but it is cropped to a size relative to the original camera image size. Its borders will always stay within the original image and it will be scaled to 'Final Image Width/Height' dimensions for transfer.
E.g. if the camera image is 1280x1024 pixels, and the relative size factor is set to 50%, then an image of size 640x512 ppixels will be centered at the detected license plate co-ordinates and then be transferred.
- Cropped LP Size Relative Image
- An image cropped around the license plate with a size in % relative to the original license plate size and scaled to 'Final Image Width/Height' dimensions. The size must always be > 100%. The extracted image is always kept within the original image and it will be scaled to 'Final Image Width/Height' dimensions for transfer.
The parameter Image quality refers to the JPEG compression of the transferred image, its range is between 1 to 100%. We recommend setting this parameter to 50-70%.
If the Image Overlay selector at the bottom of the dialog is marked, then additional action information (time of detection, etc.) will be imprinted at the top of the cropped images.
In case that your CARRIDA device supports a second camera (e.g. CARRIDA on a Jetson Nano board), an additional Upload Overview option will visible in the action dialog. It allows you to also transfer the full image of the overview camera to the ftp server.
4.7.3 Ftp Database
An ftp Database is a text file on your ftp server which is updated by the camera using the ftp protocol. The text file is extended with a new line for every detection - you can specify the format of the text with the parameter Entry Pattern, which may contain any plain text and the CARRIDA placeholders.
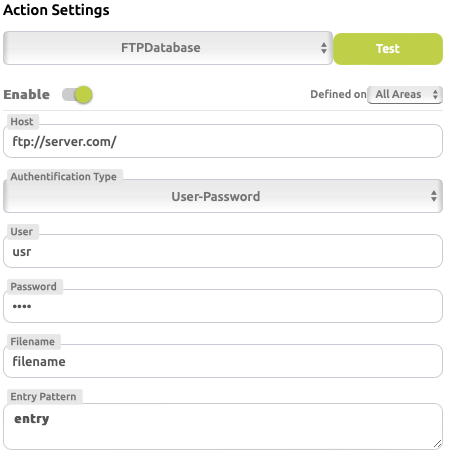
Enter the Host ftp servers IP address in the form of (s)ftp://192.168.3.127/[...].
As authentication you may choose between User/Password Authentication and Private Key Authentication just as with the ftp action type described above.
Filename stands for the name of the database to be updated (created) with the new text string.
4.7.4 Store
Warning

This action is recommended for expert users only!
This action stores images directly on the camera. Use this action type to collect images for later use. This feature is mostly used for testing, it can also be used to collect images for training and development purposes to improve CARRIDA.
The filename is constructed of a path name, and a dynamic filename, which may contain any placeholder. Note that we recommend using the file path /mnt/sd/my_folder_name as storage location on the camera.
The Image Store dialog allows you to configure that images are cropped and uploaded as with the ftp action type.
Images are only stored on the camera if at least Min Free Space (MB) Megabytes of free space is available on your edge device.
Warning
You may use a placeholder as folder name, for example you can create a folder for every hour of the day. If you try to create too many folders on the camera, (>1000) it may slow down significantly or stop working altogether.
4.7.5 Digital Out
This activates a specified digital output line on the camera for a given time period (Output duration).
Select which Output pin will be activated by the action.
Output duration defines the duration of the output signal in milliseconds.
The Invert signal option inverts the polarity of the IO line.
4.7.6 Serial
Construct a message using text and placeholders and send it through the serial port of the camera with the specified Baud rate.
The message field may contain any plain text and the CARRIDA placeholders.
4.7.7 TCP
Send a message using TCP protocol.
The message field may contain any plain text and the CARRIDA placeholders. The IP address and Port of define the network address of the receiver.
4.7.8 HTTP
Perform an HTTP action with the specified Request Type
- POST,
- PUT,
- DELETE,
- PATCH.
to server address given in URL.
The message field may contain any plain text and the CARRIDA placeholders.
As authentication you may choose between
- Basic
- Supply the Username and Password for the HTTP(S) server.
- Certificate Based
Select a private key file which is to be used for authentication.
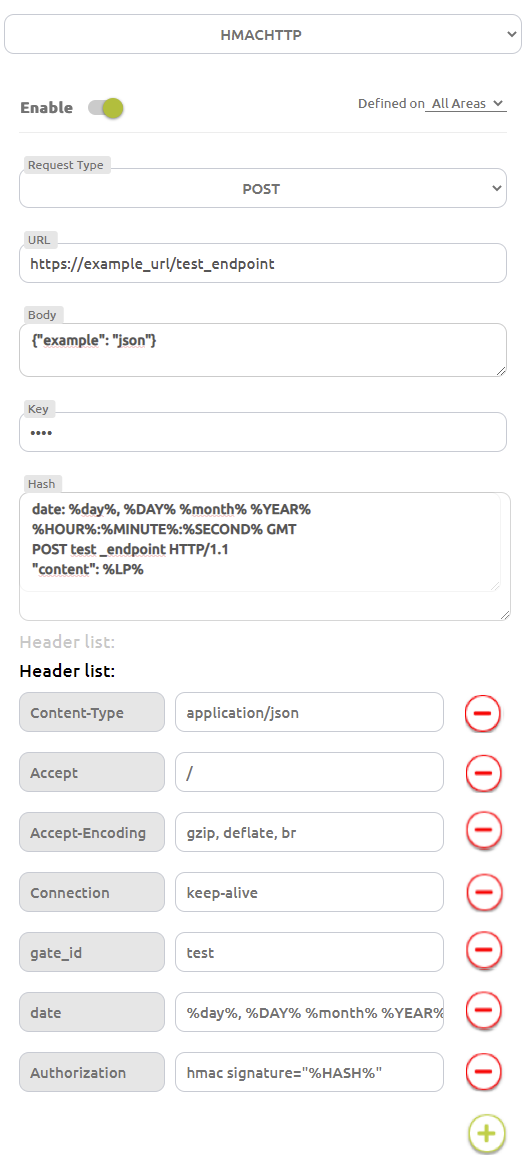
4.7.9 HMAC
Note
This Section does only apply to selected CARRIDA camera models.
The following description assumes that you are familiar with the use of the HMAC protocol.
The HMAC protocol allows yo to define messages for secure communication with a server in a flexible way. You can mix fixed text elements with the typical CARRIDA placeholders in order to create dynamic HTTP headers and body texts.
The HMAC dialog of the action definition is shown below, it allows you to specify all necessary request elements for communication with a server.
The HTTP request type for this action is selected from a pull down menu:

The URL parameter defines the server address.
The Body parameter allows you to specify the message body, including the usual placeholders.
The Key parameter allows you to specify the key value, which is used to encrypt the message hash.
The Hash parameter specifies the elements of the message for the computation of the message hash. You can mix text fields with CARRIDA placeholders:
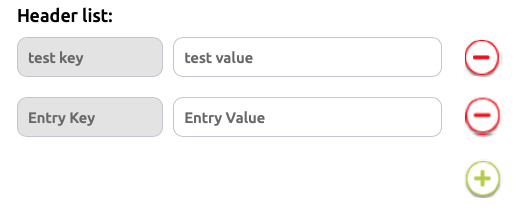
The Header list parameters specify which elements are combined to make up
the HTTP message header. You can add an arbitrary number of elements to the
list by clicking the  button, or remove an existing entry by
clicking the
button, or remove an existing entry by
clicking the  button.
The following image shows you an example of an HMAC specification as it could be used to communicate with the server in a data center:
4.7.10 Timed Actions
Timed Actions are a special class of actions which are triggered by a timer in regular intervals. You can use the same action types as in all other event types.
A timed action starts at a specific time Action Time and it will be activated with a returning interval defined by the fields Days, Hours, Minutes and Seconds.
| Example: | The following image shows the configuration of a Digital Output action. IO Line 1 will be activated for 100 ms every hour, starting at 15h00. 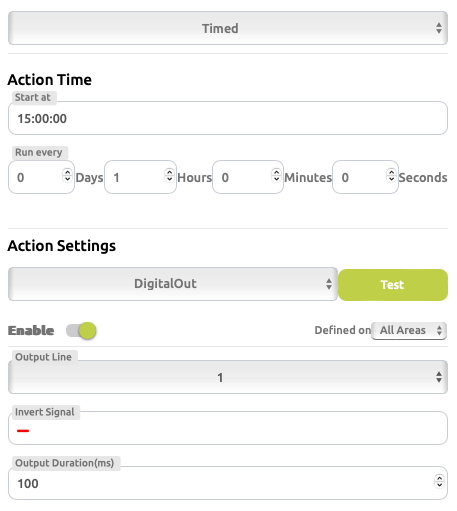
|
|---|
5 MQTT Configuration
Note
The section assumes that you are familiar with the MQTT protocol.
The interface for MQTT is divided into two parts:
- MQTT Server Definition
- You configure connections to MQTT servers from the MQTT Servers tab, in which you define their location and properties. Each server gets its unique ID.
- MQTT messages
- are configured and triggered from your edge device within actions. Refer to MQTT servers by their ID from within actions.
5.1 Configuration of MQTT settings
The tabulator page Actions->MQTT presents you with the current list of MQTT servers which you have setup so far. You can add a new server anytime and use its ID as reference in action definitions (see below).
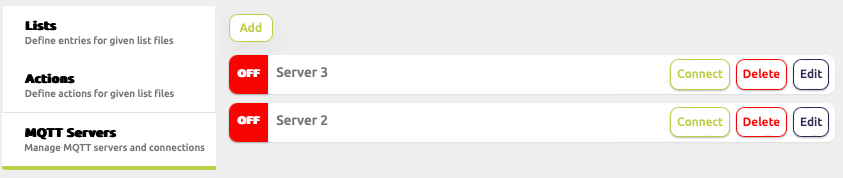
You can add a new server with the button, remove an existing
server from the list with , and configure a server with  .
.
The MQTT server configuration page allows you to configure the server connection as needed. All global server parameters are setup here. Individual messaging details are configured in the MQTT action dialog.
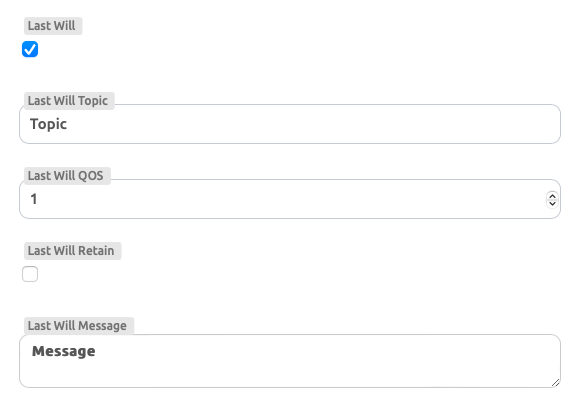
If you check the Last Will flag, the dialog extends to present you with the options necessary to define an MQTT last will configuration.
After the configuration of all server parameters is done, you can save the
setup by pressing .
In order to confirm your settings and connect to the new MQTT server, click the
 button. The connection is being built up and tested.
You do not need to connect with this button before an action can be used!
5.2 MQTT Publishing
MQTT messages are published from within actions, their content is defined in the MQTT action dialog. You can construct a message which is made up of text, all the possible placeholders, and images using their respective placeholders.
The Server pull down menu allows you to choose one of the pre-defined MQTT servers. The parameters topic, QOS are the standard MQTT protocol elements used for this message.
6 Settings
6.1 Overview
The Settings page allows you to adjust the camera parameters which are necessary to optimize its operation for a specific use case. For example you can define regions of interest for detection, or adjust image brightness.
In order to give you an overview and, for many parameters, immediately see the effect of your changes, the page shows a live image. The right hand side of the Settings page groups the camera parameters in several sub-menus which can be opened and closed by clicking on the name. Depending on the selected sub-menu, additional information and graphical overlays are shown on the live image.
6.2 Camera
The Camera settings sub-menu is used to adjust the imaging properties of the camera. Note that some settings apply only to the Plate-i Dome camera model.
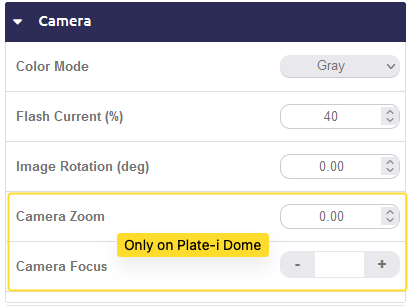
6.2.1 Color Mode
The Plate-i camera can either use color images for processing, or gray images only. Color images are possible as long as there is sufficient ambient light available. The built in light sensor switches to gray images/IR LED illumination, as soon as it is getting too dark, it switches back to color mode when sufficient light is available.
If Color Mode is set to Gray, the IR Flash is always on and the camera uses gray images only. This mode optimizes reading accuracy and frame rate of the camera.
Note
Color mode slows down the processing frame rate of the camera, we recommend
to use color mode only if vehicles are slow (< 10 km/h).
6.2.2 Flash Current (%)
Defines the relative power of the built in flash.
If license plates are constantly too bright, reduce the flash current.
If license plates are constantly too dark, increase the flash current.
6.2.3 Camera Zoom (only on Plate-i Dome)
The Plate-i Dome has a manual zoom option which allows you to optimize the field of view (FOV) of the camera. By using maximum zoom the camera will be able to read license plates up to a distance of 16 m.
The following table shows the minimum/maximum FOV in meters for several distances:
| D (m) | FOV, min zoom | FOV, max zoom |
| 1.0 | 0.97 | |
| 1.5 | 1.45 | |
| 2.0 | 1.94 | |
| 2.5 | 2.42 | |
| 3.0 | 2.92 | 0.92 |
| 4.0 | 3.88 | 1.23 |
| 5.0 | 4.86 | 1.54 |
| 6.0 | 5.82 | 1.84 |
| 7.0 | 2.15 | |
| 8.0 | 2.46 | |
| 9.0 | 2.76 | |
| 10.0 | 3.07 | |
| 11.0 | 3.38 | |
| 12.0 | 3.68 | |
| 13.0 | 3.99 | |
| 14.0 | 4.30 | |
| 15.0 | 4.61 | |
| 16.0 | 4.91 |
The standard Plate-i model has a fixed focus lens, for comparison its FOV for several distances is listed in the following table:
| D (m) | FOV (m) |
| 1.0 | 0.90 |
| 1.5 | 1.35 |
| 2.0 | 1.81 |
| 2.5 | 2.26 |
| 3.0 | 2.71 |
| 4.0 | 3.61 |
| 5.0 | 4.52 |
| 6.0 | 5.42 |
| 7.0 | 6.32 |
6.2.4 Camera Focus (only on Plate-i Dome)
Only the Plate-i Dome has a manual focus option. Each time the zoom factor of the lens is adjusted, the focus has to be adjusted as well.
Use the left and right triangle to move the focus point of the lens until the image is sharp at the desired distance. You can monitor the effect of focus change directly in the live image on the left side.
6.2.5 Image Rotation (deg)
In situations where the camera has an oblique view onto the street, it might be useful to rotate the image after capture so that the license plates appear horizontal. This is not a strict requirement for good readings, but it can improve recognition quality.
The effect of the rotation parameter is directly visible after you set a new value.
Note
Using a rotation slows down the processing frame rate of the camera, we
recommend to use rotation only if absolutely necessary. Try to align the
camera during installation instead.
6.3 Trigger
The Plate-i camera can be triggered by external signals. These trigger signals can enable and disable the operation of the camera in a flexible way.
Within a trigger period, when the camera is active, it behaves like in free running mode. This means that reading and sending of LP texts, list matching etc. is performed as usual.
If no LP has been detected at the end of an active trigger period, the camera can optionally create a NoRead event and perform an action. This feature may be useful if you are expecting a vehicle within the trigger period, but it fails to show up.
The trigger type parameter is used to select the trigger source.
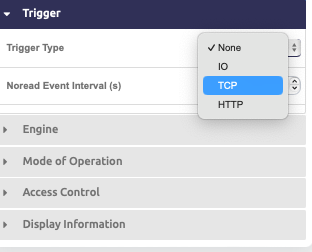
- None
- When selected, the trigger mode is turned off and the camera operates in free running mode. This should be the default mode when an external trigger is not available or not required.
- Digital I/O
The trigger signals are provided using the available I/O lines on the camera. It is possible to use a single I/O line to Start and Stop, or you can send the Start and Stop signal using separate I/O lines.
Note that the IO trigger type may be unavailable on your device.
- TCP
- This trigger type allows SW triggering. Send a TCP message from your server to the camera IP address + port.
- HTTP
This trigger type allows SW triggering using a simple REST API.
Send a HTTP GET request to
- Endpoint http://camera_ip/trigger/start as Start signal
- Endpoint http://camera_ip/trigger/stop as Stop signal
Note
In the following section, the term session will be used to describe the
time between the start signal by a trigger and the end of a triggered
period, which can either be signaled through another I/O signal or by a timer.
A session is the only time period in which the camera reads license plates when in triggered mode.
Hint
 The electrical requirements for digital IO and triggering are defined in
section The Plate-i IO Interface.
The electrical requirements for digital IO and triggering are defined in
section The Plate-i IO Interface.
6.3.1 Trigger mode
This section lists all different trigger types and their associated trigger modes.
- None
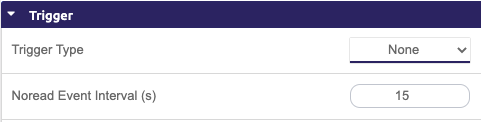
This is the default free running mode, no external or internal trigger is active.
The optional NoRead parameter allows you to trigger NoRead events in regular intervals. It specifies the time span without any plate reading until a NoRead event is created.
The NoRead event mechanism can be used in all modes of operation (parking, single, etc.). For example, if parking mode is used, the camera will send the first reading of LP to a server. As long as the same car is detected, no further readings will be sent, nor will a NoRead be triggered. When the car leaves the gate, after NoRead event seconds, an action will be triggered if no other car enters the field of view of the camera, continuously until a new license plate enters the view.
If the NoRead interval is set to 0, it will be ignored.
- IO Lines Single Line Active
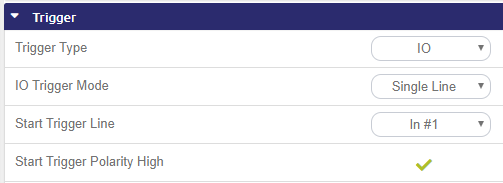
Reading is triggered by a digital I/O line. Reading is performed as long as the line is active.
Setup: Define Start trigger line, Start trigger polarity. If Start trigger polarity high is enabled, the session will start when the input signal is transitioning from low to high. If Start trigger polarity high is disabled, the session will start when the input signal is transitioning from high to low.
Start: The session will start when the signal from Start trigger line is received.
Stop: The session is ends when the signal on the input line changes its state again.
- IO Line Start/Stop Signals
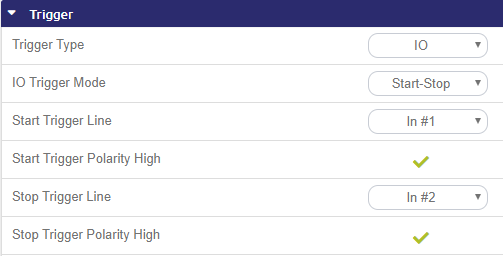
Start and stop reading is controlled by separate I/O lines.
Setup: Define Start trigger line, Start trigger polarity. In addition, define Stop trigger line and Stop trigger polarity. If Start trigger polarity high is enabled, the session will start when the input signal is transitioning from low to high. If Start trigger polarity high is disabled, the session will start when the input signal is transitioning from high to low.
Start: The session will start when the signal from Start trigger line is received.
Stop: The session stops when the signal from Stop trigger line is received. In case a new trigger signal is received while the old session is still open, the camera closes the old session and opens a new session immediately.
- IO Line Start with Timeout
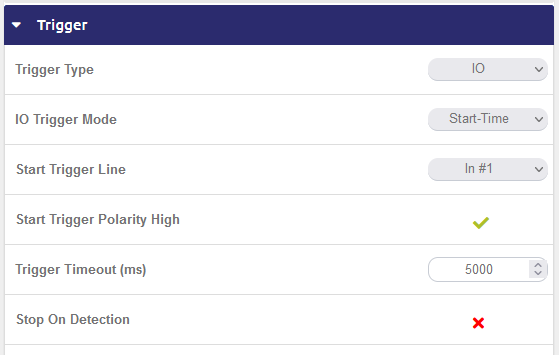
Read until a license plate has been detected, or until the timeout has been reached.
Setup: Define Start trigger line, Start trigger polarity, and Trigger timeout. If Start trigger polarity high is enabled, the session will start when the input signal is transitioning from low to high. If Start trigger polarity high is disabled, the session will start when the input signal is transitioning from high to low.
Start: The session will start when the signal is received.
Stop: The session lasts until the timeout has been reached. In the case that Stop On Detection is enabled session will be stopped immediately as camera detects first license plate.
In case a new trigger signal is received while the old session is still open, the old session will be extended to a new timeout period. In this case, the camera does NOT generate NoRead events for the interrupted session.
- IO Line Single Shot Read
Note
This mode should only be used if the engine is set to single mode.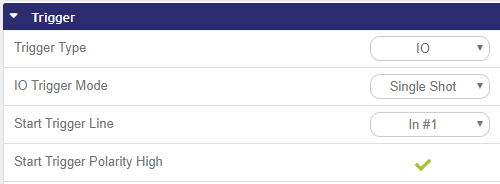
Setup: Define Start trigger line, Start trigger polarity. If Start trigger polarity high is enabled, the session will start when the input signal is transitioning from low to high. If Start trigger polarity high is disabled, the session will start when the input signal is transitioning from high to low.
Start: The session will start when the signal from Start trigger line is received.
Stop: The session ends after grabbing one shot.
- TCP with Start/Stop message
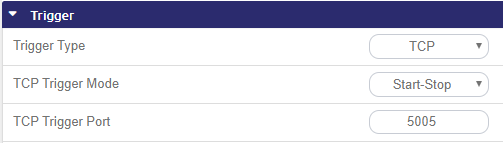
This trigger type allows SW triggering. Send a TCP message from your server to the camera IP address and the specified port as follows:
- The messages all have exactly length 1.
- A message with value 1 (0x01) is interpreted as Start signal.
- A message with value 0 (0x00) is interpreted as Stop signal.
- All other messages will be ignored.
Setup: TCP Trigger Port - set a port to which shall receive the trigger message.
Start: When a message with value 1 (0x01) Byte is received.
Stop: When a message with value 0 (0x00) Byte is received.
- TCP with Timeout
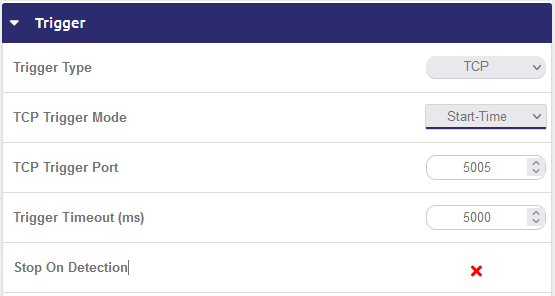
Read until a license plate has been detected or until the timeout has been reached.
Setup: TCP Trigger Port - set a port used for the TCP Trigger. Trigger timeout (ms) - maximal waiting time in milliseconds for a reading after the trigger signal.
Start: When a messages with value 1 (0x01) Byte is received.
Stop: The session lasts until the timeout has been reached. In the case that Stop On Detection is enabled session will be stopped immediately as camera detects first licenseplate.
- TCP Single Shot Read
Note
This mode should only be used if the engine is set to single mode.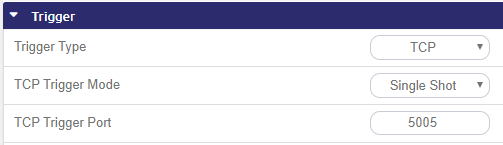
Setup: TCP Trigger Port TCP Trigger Port - set a port used for the TCP Trigger.
Start: when a message with value 1 (0x01) Byte is received.
Stop: The session ends after grabbing one shot.
- HTTP with Start/Stop
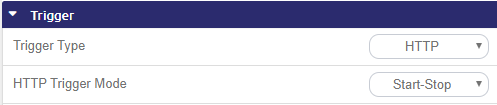
Control the reading wioth HTTP requests to endpoints.
Setup: No need for setup.
Start: Send an HTTP GET Request to the endpoint: http://camera_ip/trigger/start
Stop: Send an HTTP GET Request to the endpoint: http://camera_ip/trigger/stop
- HTTP with Timeout
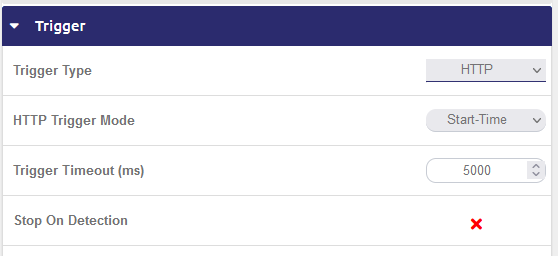
Read until a license plate has been detected or until the timeout has been reached.
Setup: Trigger timeout (ms) - maximal waiting time in milliseconds for a reading after the trigger signal.
Start: Send an HTTP GET Request to the endpoint: http://camera_ip/trigger/start
Stop: The session lasts until the timeout has been reached. In the case that Stop On Detection is enabled session will be stopped immediately as camera detects first licenseplate.
- HTTP Single Shot Read
Note
This mode should only be used if the engine is set to single mode.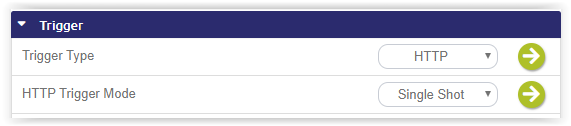
Grab and read one frame.
Setup: No need for setup.
Start: Send an HTTP GET Request to the endpoint http://camera_ip/trigger/start
Stop: The session ends after reading one image.
6.4 Engine
The preset default values of the Plate-i engine usually result in good reading results, but they can be modified to tune the OCR to specific application requirements.
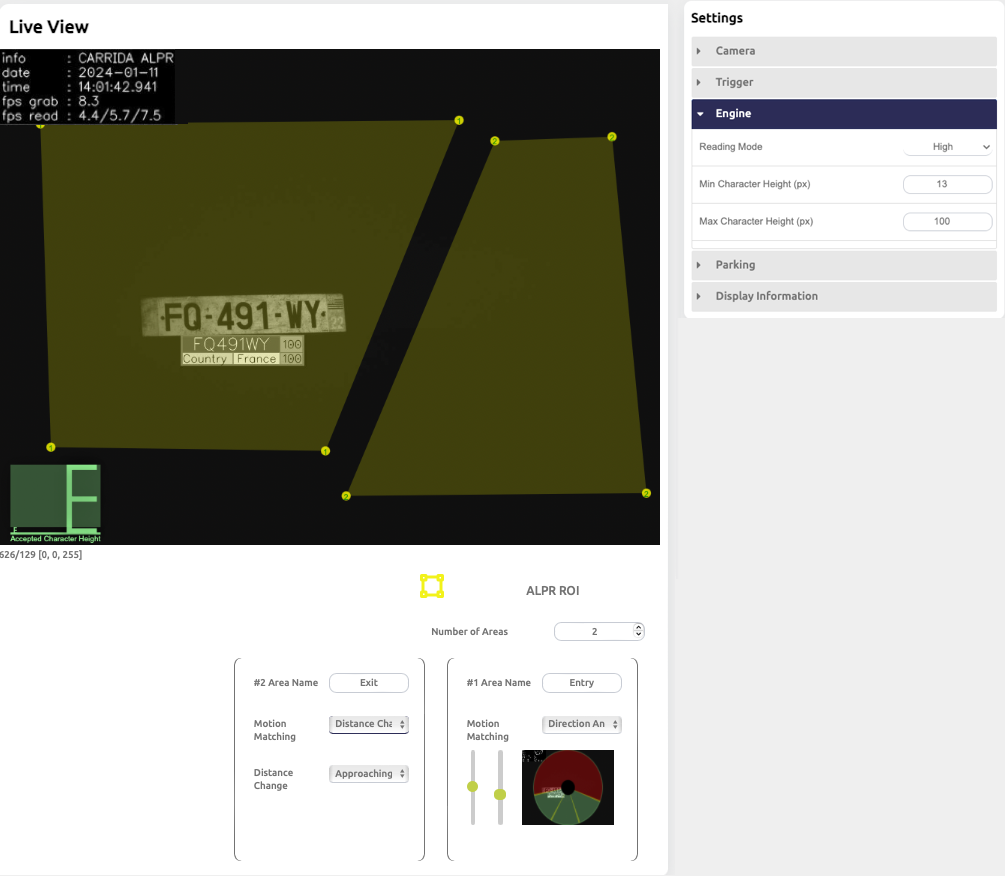
The Settings page with opened Engine tab on the right side shows you a live image of the camera with additional information superimposed. The main purpose of the live image is to allow you to set up the Region of Interest (ROI) in the image within which reading is performed.
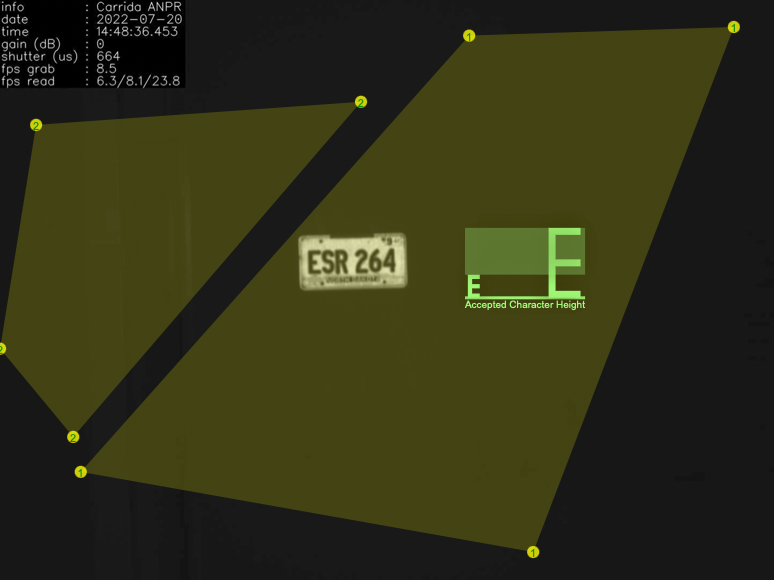
6.4.1 ANPR Region Of Interest
The ANPR Region of Interest (ROI) is the yellow polygon superimposed on the camera image, it defines the image region were the actual reading takes place. Note that several disjoint ROIs may be defined in an image, e.g. you can define a polygon for an exit area, and a polygon for an entry area in the image (see image example above).
For each ROI a direction and direction range of motion, or a distance change qualifier can be defined to filter LPs according to their motion - this is explained in Section ANPR Region Of Interest with Direction below.
A ROI polygon can have an arbitrary number of contour points, but it must contain at least 3 points. The corners of the polygon are marked as small yellow circles with the area number inscribed (see screenshot above). The shape of the polygon can be modified as follows:
- Adjusting the ANPR ROI polygon
Click, drag and release a corner of the polygon to move it.
Add corner points by double-clicking near an existing corner point. The newly created point can then be dragged to its new location.
Delete an existing corner point by moving the mouse over it and right click.
Move the entire polygon by pressing ctrl on the keyboard and dragging a corner with the mouse. This moves the whole polygon.
More than one region of interest can be defined by setting the number of desired regions in the Number of Areas box. You can also provide a custom name for an area - this name can be used in Actions as reference to this ROI.
The example below shows a definition of two ROIs. Note that the small images are actual live images from the camera. The areas have been given the names Entry Lane, and Exit Lane respectively.
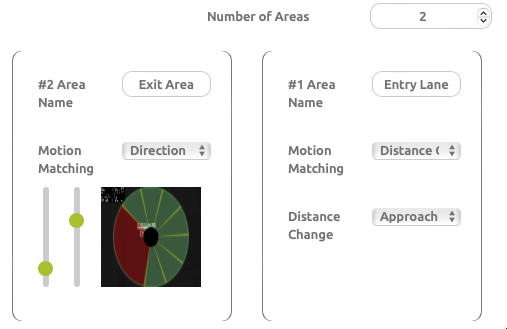
6.4.2 ANPR Region Of Interest with Direction
An region of interest may be combined with a motion filter so that license plates are only accepted if they move in certain directions.
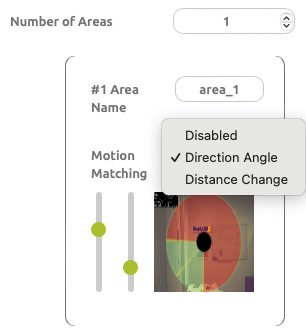
You can choose the type of motion filter with the pull down dialog next to Motion Matching:
- Disabled
- No motion filtering is used. Any license plate within the area is accepted.
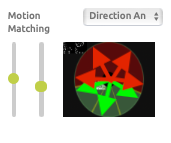
- Direction Angle
A license plate must move in a defined direction in order to be accepted.
Directions are visualized as green/red sectors - green sections mark the accepted driving direction, red sections define invalid directions.
In the example below, a direction from right to left bottom with an angle range of approx 140 degrees is defined as green. The colored arrows in the image show examples for which motion directions would be accepted (green) or rejected in this case (red).
- Distance Change
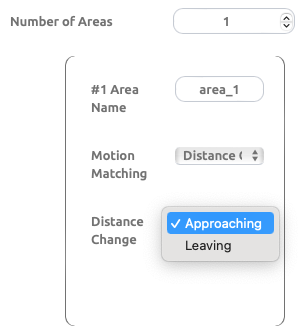
Note
In order to use the motion direction filter, the minimum number of detections must be set to a value >=2.
6.4.3 Reading mode
The Plate-i engine can operate in several performance modes, which balance processing speed and reading accuracy differently. The faster modes offer a higher reading speed on the camera at the cost of lower reading accuracy, and vice versa.
- Standard
- A good compromise between speed and reading performance.
- High
High mode is about half the speed compared to Standard mode. The reading accuracy of High mode is very good at reasonable speed.
This mode recommended for most applications.
6.4.4 Min character height (px)
Defines the minimal height of characters, in pixels, which are to be recognized. The camera will only accept characters equal or larger in height than this value.
Use this parameter if license plates above a minimum size should be read - e.g. by enforcing a value of 16 px, license plates too far from the camera will be ignored because they are too small.
We recommend that this value should not be less than 12 pixels.
6.4.5 Max character height (px)
Defines the maximum height of characters, in pixels, that are to be recognized. The camera will only accept characters equal or smaller in height than this value.
6.4.6 Easy configuration of Min/Max character height
Instead of using numerical values for the min/max character height, you can change those values interactively in the live camera view of the settings page. The currently accepted character sizes are visualized as overlay, where the two E characters resp. the light green rectangle show you the accepted size range:

Click on the this overlay with the mouse to adjust. Note that the numerical parameters in the value fields on the right side are synchronized accordingly.
- Adjusting the accepted character sizes
Click and drag the upper border of the rectangle to modify the accepted maximum height.
Click and drag the lower border of the rectangle to modify the accepted minimum height.
Click and drag within the text Accepted Character Height to move the rectangle.
In the next example the overlay has been dragged to the actual license plate location and adjusted:
6.5 Parking Mode
The Plate-i camera operates in Parking mode, which means that it reads a new license plate constantly, but transmits it only once after detection - Parking mode returns unique license plates only and suppresses multiple readings.
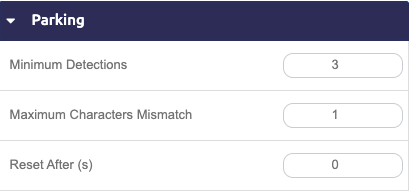
Each vehicle number plate is required to be detected at least for Minimum Detections. The useful range for this parameter is 1-4.
Maximum characters mismatch refers to the maximum number of characters by which two consecutive readings are allowed to differ and still be considered identical. The useful range for this parameter is 0-3.
Parking mode accepts a license plate if:
- it is inside an ANPR region of interest,
- it moves in an allowed direction,
- it has been detected for at least Minimum Detections,
- the detected strings do not differ more than Maximum Characters Mismatch.
The Reset After (s) timer forces the re-transmission of a license plate reading after the set time interval, if the license plate is still detected.
If Reset After (s) is set to 0, plate texts will never be re-transmitted.
6.6 Access control
Note: This option is available only on selected models.
Settings in this menu control several aspects of access control features on the camera.
6.6.1 Whitespace Matching
This parameter defines whether white spaces (' ') should be considered during reading. This may be relevant in the following situations:
- Matching of strings in the Whitelist.
- Matching of strings in the Blacklist.
- Manual editing of list entries - use of space character is allowed/prohibited.
License plate texts will not contain white spaces if this option is turned off.
Warning
Special care has to be taken when lists with white spaces are created or
imported, and white space matching is disabled. In this case white spaces
are ignored by the camera and LP entries with a white space will never
be matched.
6.7 Display Information
The set of parameters in the Display Information menu allows you to configure the display of information in Live View with the On-Screen-Display (OSD).
Enabling/disabling any of these options will take immediate effect on the live image display.
6.7.1 OSD Size
This parameter affects the size of the OSD in the image. Select between small, medium or large.
6.7.2 OSD Position
The HUD can be positioned on the top/bottom left side, or top/bottom right side of the image.
6.7.4 OSD Display Options
Several options are available from this pull down menu. Click the dialog field to open the menu.
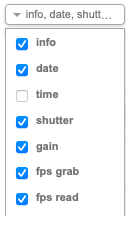
- info .. The text info.
- date .. The current date.
- time .. The current time.
- shutter .. The sensor shutter time in microseconds.
- gain .. The sensor analog gain in dB.
- fps grab .. Frames per second which are currently retrieved from the camera sensor. Depending on the processing load of the camera, some images may be skipped, resulting in the actual fps read:
- fps read .. Average detection frame rate. Depends on the image size and many other settings. The frame rate is averaged over 3 different time periods and displayed as fr1 / fr10 / frtotal, where
- fr1 .. The processing frame rate averaged over the last second.
- fr10 .. The processing frame rate averaged over the last 10 seconds.
- frtotal .. The processing frame rate since the server has been started.
6.7.5 Plate Display Options
Several options for the plate visualisation are available here.
- confidence .. Reading confidence for this plate.
- state .. Detected country resp. state.
- character info .. Confidence of each character - mainly used for debugging.
- region .. If available, City/Province information.
7 Configuration
The Configuration page allows you to maintain the camera, adjust network and time settings and upgrade the CARRIDA firmware and region files.
The Configuration page is divided into a sub-menu on the left, a Device Management pull down menu at the top left, and the menu dependent dialogs and information on the right.
7.1 Device Management
With the Device Management pull down menu you can to perform basic maintenance functions as administrator or superuser. Regular users do not have access to this dialog.
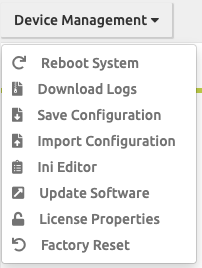
7.1.1 Reboot system
This option completely reboots the edge device. This is equivalent to a cold start of the device.
7.1.2 Shutdown System
In case that you need to power down the device, we recommend to shut it down using this action and then disconnect it from the power supply.
7.1.3 Download Logs
All camera logs can be downloaded by clicking on the Download logs button. The log files will be collected and compressed into a file name logs.zip and downloaded to the default download location of your browser.
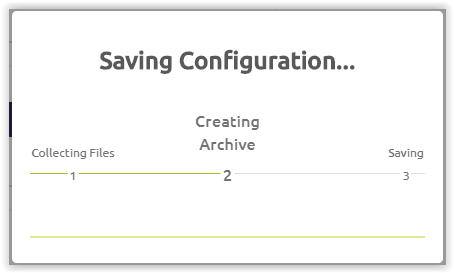
7.1.4 Save Configuration
The complete set of camera configuration parameters can be exported and stored on your PC with this button. This feature may be useful in order to make a backup of the CARRIDA configuration, or even to transfer the settings to another camera.
The configuration file will be stored at the default download location of your browser.
- The following parameters will be saved:
- classifiers
- date and time settings
- network settings
- parameter settings and region of interest definitions
- users and their permissions
- access lists
- action definitions
- information about Plate-i software versions on this camera
- the serial number of the camera
A popup window informs you about the progress while the export is being performed.
7.1.5 Import Configuration
The state of a camera can be restored by importing a previously saved configuration file using this system action.
It is possible to import configuration settings from another camera - this may be useful when you want to quickly copy and distribute camera setups.
For best compatibility, we recommend that you exchange only configuration files of the same firmware versions.
Note
Import has some limitations regarding the camera firmware versions:
- version 4.3.1 cannot import configurations other than 4.3.1.
- version 4.3.2 can import the configuration of version 4.3.2 and 4.3.1.
- version 4.4.x can import the configuration of versions 4.4.x, and 4.3.x.
- version >4.5.0 can import the configuration of all versions down to 4.3.1.
Warning
A warning dialog will appear if the serial number of the imported configuration and the actual camera are different.
You can choose which system settings to import by enabling or disabling
features from the import dialog. By default, the import of all features
is turned off so that you have to manually select what you want to import.
After making your selection, press  to proceed.
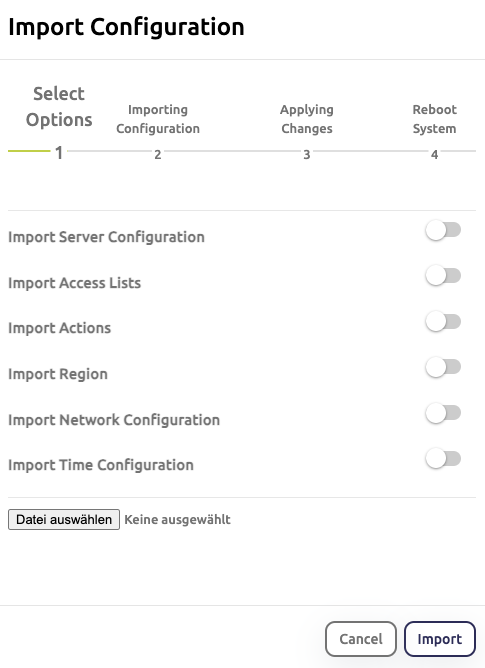
After the import is finished, a confirmation window appears to inform you about the settings that have been restored and to notify about a reboot which is necessary at this point.
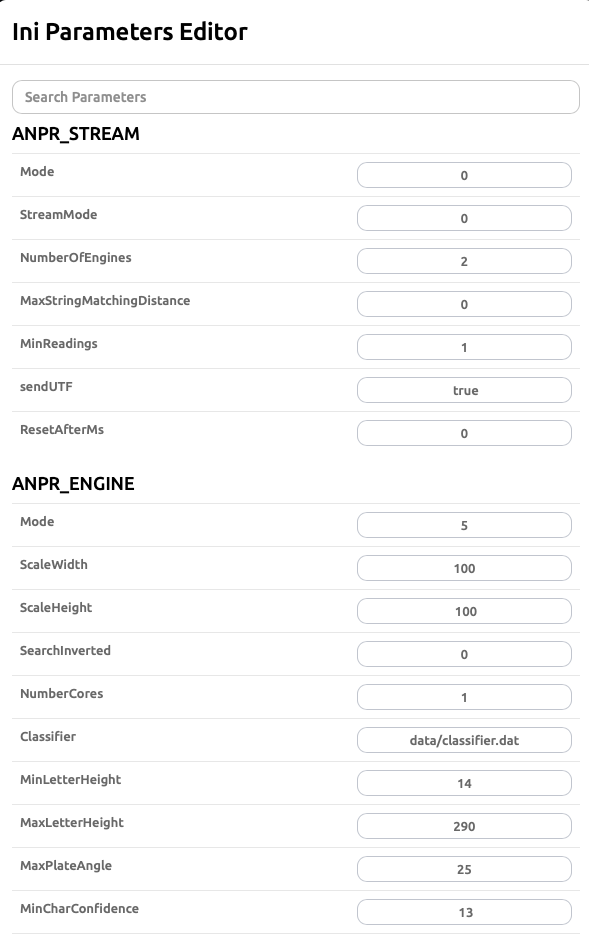
7.1.6 Ini Editor (Super admin only)
Warning
The INI editor should only be used if you know exactly what you are doing!
You need to have super admin rights.
If you are logged into the camera as super admin (su) user, you have access to a low level configuration editor for the camera. The Ini Editor allows you to modify some low level settings of the firmware, which are otherwise not accessible.
Be extremely careful when modifying one of these parameters, the camera may be rendered unusable with a wrong setting.
A new INI parameter may be added using
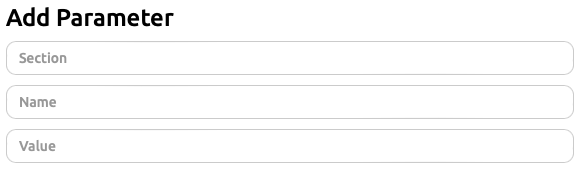
Add the desired section name, the key name, and a parameter value, then
press .
7.1.7 Update Software
Plate-i may provide a software update for your camera as an update package which
can be installed using this menu. Select an update package by choosing an update
package and then proceed with the update process by pressing  .
.
Note that the SW update will normally not modify your camera configuration.
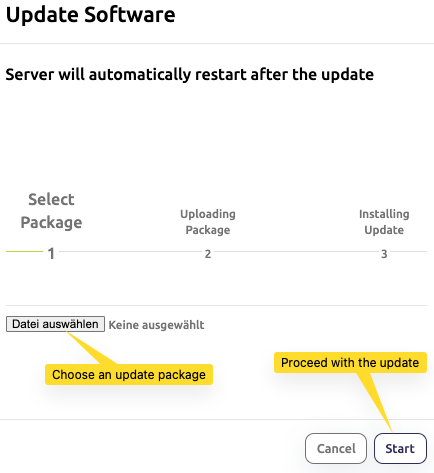
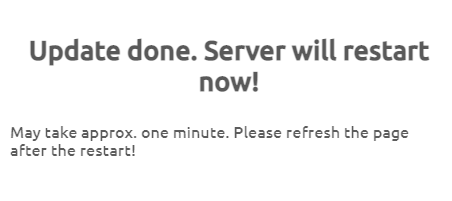
Depending on the update package provided the camera will be restarted automatically.
7.1.8 License Properties
All CARRIDA cameras except the Basic+ model require licensing before ALPR can be used. This licensing is done during factory setup, in some situations it nevertheless can be necessary to change the licensing options on the camera. This dialog allows you to (re-)activate a camera online, or offline, or to upgrade an existing license with new features.
The license properties dialog gives you an overview of currently activated license and its duration.
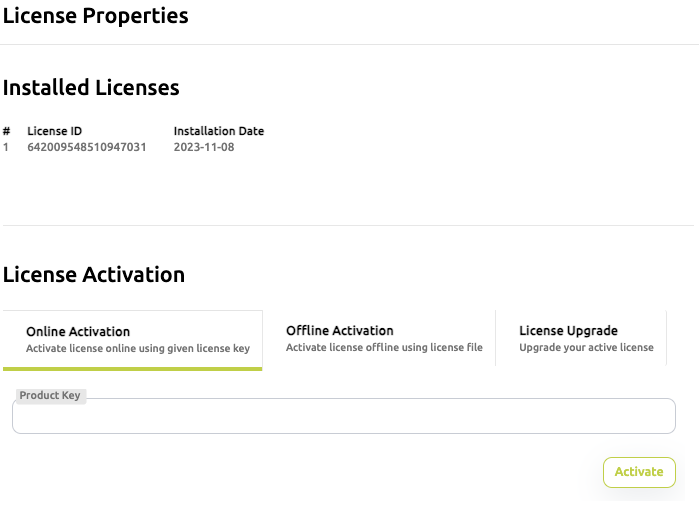
Note: A product key (PK) is a unique ID which holds your CARRIDA license when you buy it.
Several pre-requisites have to be fulfilled before you can start licensing:
- You must have a valid CARRIDA product key.
- For online activation: the camera needs to be connected to the internet, it will contact the CARRIDA licensing server.
- You must have administration access to the camera.
- Online activation
is the easiest way to activate the camera. Given a valid PK, enter it into the text field and press
 . The camera talks directly to the CARRIDA
licensing server, retrieves valid licensing information, and updates the camera
with it.
. The camera talks directly to the CARRIDA
licensing server, retrieves valid licensing information, and updates the camera
with it.- Offline Activation
allows you to activate a camera which is not directly connected to the internet.
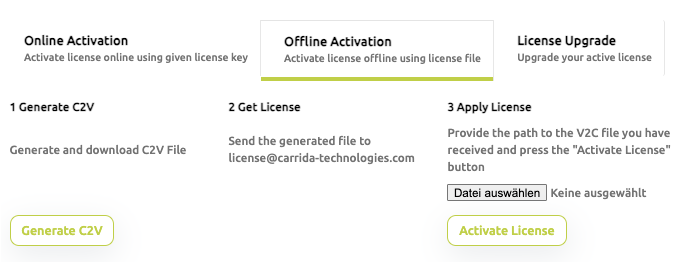
- Generate a C2V file by pressing the button. This file will be generated and downloaded to your PC, it contains all relevant information about your camera which CARRIDA requires for a new license.
- Send the C2V file to license@carrida-technologies.com.
- You will be provided with a V2C file, which you upload to the camera, it
contains your new license. Press
 to install the
new license on the camera.
to install the
new license on the camera.
- Upgrade License
allows you to change an existing license on a camera. Typical examples would be that you upgrade your camera from ALPR only to ALPR and model&make detection, or that you extend the duration of your maintenance period on the camera.
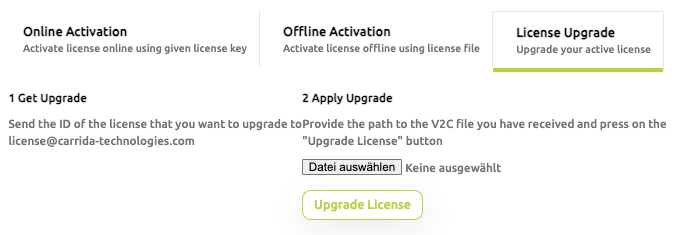
- Copy the license ID (not a PK) and send it to CARRIDA by mail to license@carrida-technologies.com. The ID is displayed at the top of this dialog. It contains all relevant information about your camera which CARRIDA requires for a license upgrade.
- You will be provided with a V2C file, which you upload to the camera, it
contains your new license. Press to install the
new license on the camera.
7.1.9 Factory Reset
This option is used to reverse the camera configuration back to factory settings.
Warning
All custom configuration data will be lost.
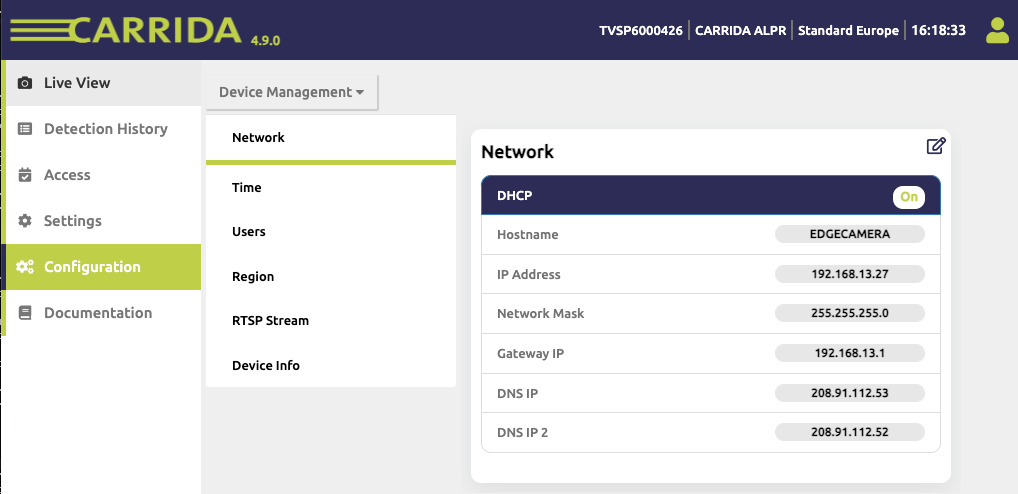
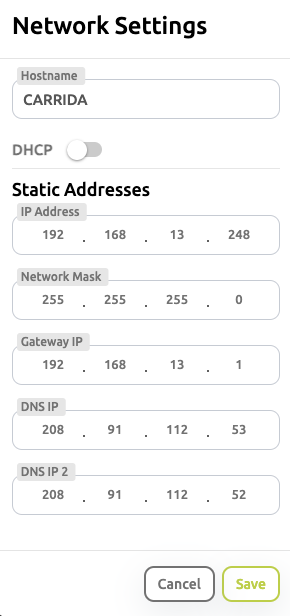
7.2 Network
This configuration page allows you setup the network connection of the camera.
Network settings can be changed by pressing the ![]() , or by clicking
in one of the parameter fields.
, or by clicking
in one of the parameter fields.
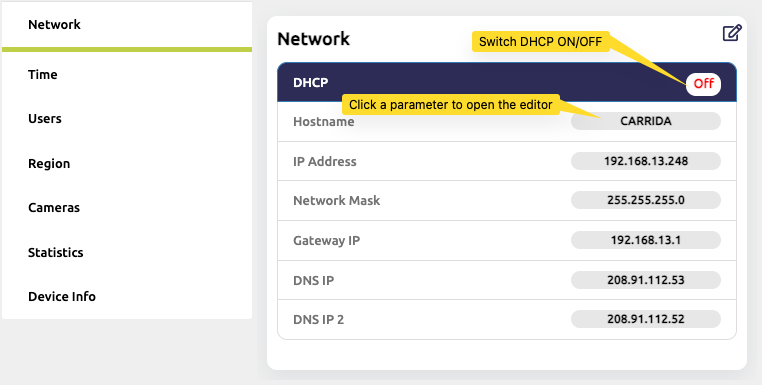
Note
When DHCP is enabled, the camera will have a dynamic IP address. Use the
Camera ClientTool in order to detect CARRIDA cameras in your local network.
More information on how to use the Camera ClientTool can be found in
CARRIDA CameraTool .
You can switch DHCP either by clicking the ON/OFF button in the Network overview dialog, or by using the switch in the Network Settings dialog.
If DHCP is turned OFF, manual network settings for all fields have to be provided in order to properly set up networking on the camera using the network settings dialog:
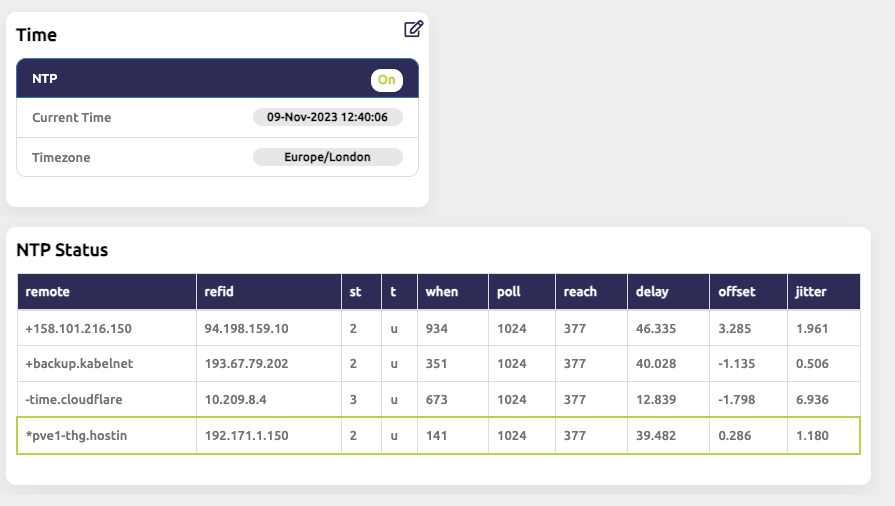
7.3 Time
The Time menu allows you to setup time on the camera. When opened, the menu page gives you an overview of the current setup.
The local time as well as timezone can be set manually (NTP off), or the NTP protocol can be used to synchronize the camera with time servers in your local network, or the internet with default or user selectable time servers.
7.3.1 Manual setup of date and time
A click within the Time pane opens up the time setting edit dialog.
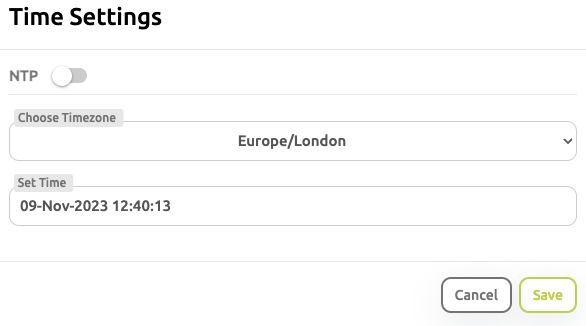
In order to manually set the camera's time, NTP has to be turned OFF by sliding
the NTP knob to the left, 
First select a timezone using the pull down dialog Chose Timezone, then manually enter date and time in the Set Time field.
will store the date/time settings and close the dialog. The time
overview menu now looks like this:
7.3.2 NTP Protocol
You can configure the camera to automatically synchronize its internal clock with a time server in the network using the NTP protocol. Typically your edge device is pre-configured with a list of standard NTP time servers, but you can customize the server list if necessary.
A click on ![]() or one of the parameter fields brings you to the
time setting edit dialog. When you enable the NTP protocol by sliding the
selector button at the top,
or one of the parameter fields brings you to the
time setting edit dialog. When you enable the NTP protocol by sliding the
selector button at the top,  , the list of active NTP servers is
displayed and may be edited:
, the list of active NTP servers is
displayed and may be edited:
Press the or button to add or delete servers.
You still may choose a timezone, but not modify the date and time display.
Pressing saves the date/time settings and closes the dialog.
When NTP is enabled, the current status is displayed below the NTP parameters. Note that this lists shows the NTP servers used by the current NTP configuration on your system.
7.4 Users (User Management)
Note
The Users dialog is only accessible in advanced modes (Administrator and
SuperUser).
Plate-i allows you to manage a number of user profiles which are differentiated by the level of access to configuration and system settings on the camera. By default, each user has the following sign-in credentials:
| Username | Password | Description | |
| SuperUser | su | car0000rida | This is a default password, and it should be changed on the first start
of the server.
Access to all settings, delete admin users and access to UI Design setting.
|
| Administrator | admin | secret | Immediate access to all settings. |
| Basic User | user | simple | Access to the most commonly used settings. |
| Setup | setup | setup | The same access level as "viewer", plus change the ROI and the classifiers. |
| Viewer | viewer | pass | Permission to view reading results and live image streaming. |
Note
The Users dialog is only accessible in advanced modes
(Administrator and SuperUser).
After clicking on the Create new button, use the pop-up dialog to create a new user profile.
7.4.1 The CARRIDA Super User
The Super User with username su has full permission on the camera. The default password for the super user is constructed using the serial number of the camera as follows:
car<SN of the camera>rida.
Note that the serial number of the camera is only available on the CARRIDA Cam Pro, CARRIDA Cam Basic+, and CARRIDA Dragon models. All other supported devices, including Plate-i and Plate-i Dome use the code '0000' as default serial number. As per factory default, the Super User password is therefore set to car0000rida on those devices.
Note
7.5 Regions
Country specific details of license plates are stored as Region files on the camera. Region files are created for different countries, or regions of the world (Europe, USA, Thailand...) by CARRIDA.
The CARRIDA camera stores region files as part of its firmware. The Region menu of the Configuration page allows you to upload new regions, delete old ones, or activate any region information which is stored on the camera.
The region files which are currently available on the camera are listed below Available Regions below the Current Region information field:
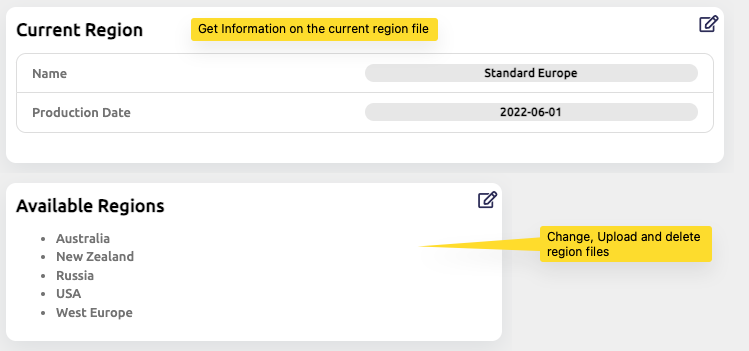
Note that only one Region may be active on the camera at a time, but a region file can contain information about an arbitrary number of countries (e.g. all countries of the EU).
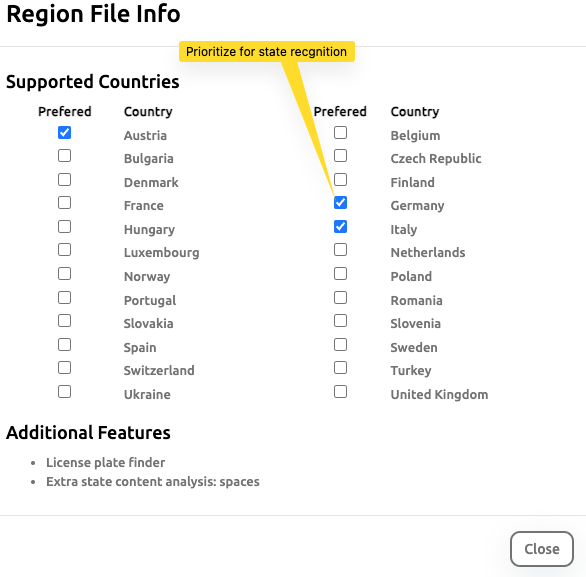
7.5.1 Current Region Information
You can view information on the currently selected region by clicking inside the top pane Current Region. This will open a dialog which displays information about the states it supports.
The check mark fields are used to prioritize the recognition of the selected countries as well as geographically surrounding countries. They are prioritized for state recognition, making the recognition more accurate overall.
Note: Even if you do not mark a country in the list, it will still be part of state recognition!
7.5.2 Managing Regions
The camera can store a large number of regions as part of its firmware, and those can be selected and activated anytime. To do so, click inside the Available Regions pane to open the region management dialog.
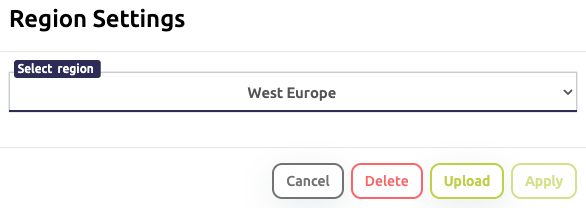
Select a region
The Select region pull down dialog allows you to switch between all available countries which are available on the camera.
Upload a new region to the camera
 opens the dialog to load a new region file onto the camera. It
brings up a dialog window into which a new region file can be dropped
('Drop region file here...') or uploaded by clicking .
opens the dialog to load a new region file onto the camera. It
brings up a dialog window into which a new region file can be dropped
('Drop region file here...') or uploaded by clicking .
Note
The region file has the extension .dat. Usually the CARRIDA region
file packages come as ZIP archives which contain the .dat file and an associated
.ini file. You can ignore the .ini file. only the .dat file is currently
used on the camera.
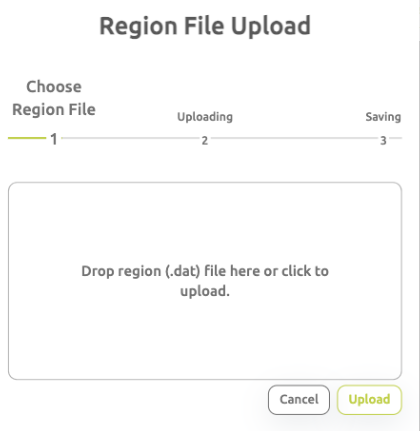
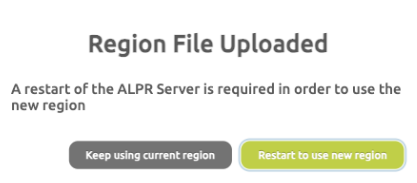
When the new file is considered valid and has been uploaded to the camera, you can
- activate and use it immediately. This will require a restart of the camera.
- continue to use the current region file. Activate (select) the newly uploaded region file at a later time.
Delete a region file from the camera
allows you to delete any, but the currently active, region
file from the camera.
7.6 SSL
Note
You have to have super user rights in order to modify the SSL settings on
your edge device.
If you enable the SSL protocol on the camera, the communication with its web server (including all HTTP based communication like the REST API) becomes much more secure.
Note
If SSL is turned on, the web server uses the HTTPS protocol by default. If a
connection is requested on port 80 for the insecure HTTP protocol, the server
automatically redirects this connection request to HTTPS.
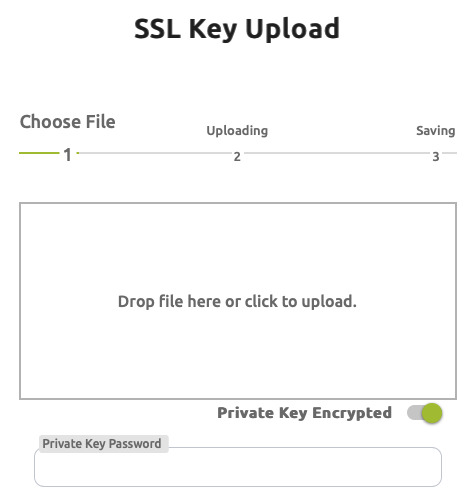
The SSL page allows you to setup SSL and upload the required certificate files.
Before you can use SSL, you have to enable it by sliding the Use SSL switch:
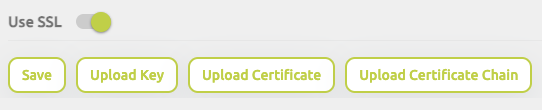
You can use the buttons to upload
- certificate chains using
 ,
, - certificate files to the camera using the
 ,
button,
,
button, - an SSL key using the
 button.
If the private key is also encrypted, set the Private Key Encrypted switch on, and provide the password in the text field below:
7.7 Device Info
The Device Info menu page displays general information about the
- camera software module versions,
- CARRIDA licensing information,
- and the status of the available digital I/O lines.
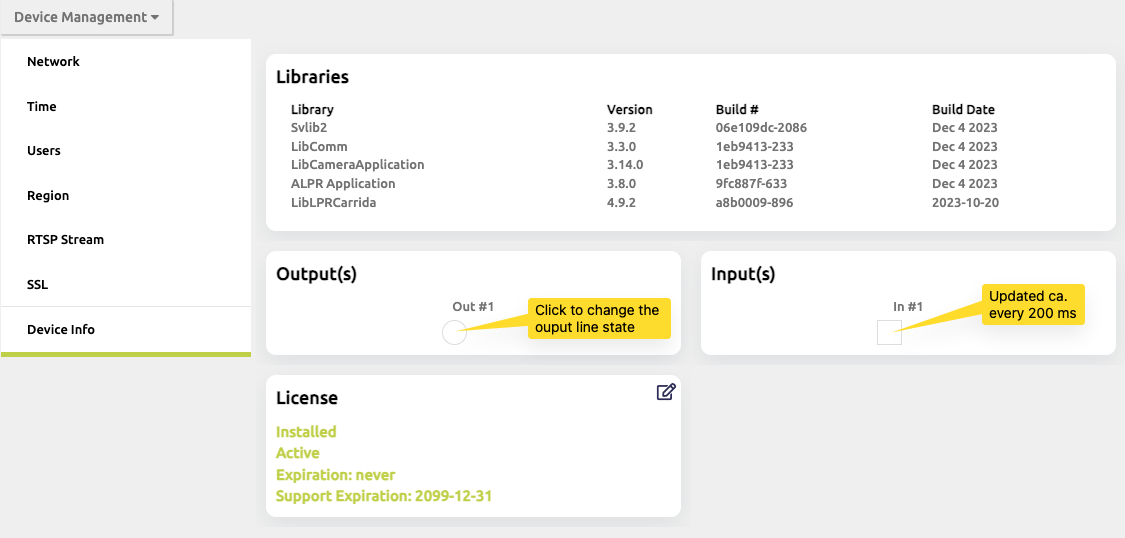
7.7.1 Libraries
This table lists all versions and build dates of the Plate-i software libraries on the camera.
7.7.2 Input(s)/Output(s)
Note
I/O controls are only displayed if your edge device supports digital I/O.
The Inpput(s) and *Output(s) displays information about the current status of the digital IO lines of the Plate-i camera.
The output state can be switched by clicking on the respective output circle.
Note that the I/O line status is updated approximately every 200 ms.
7.7.3 License
This pane shows you information about the current camera licensing status. Clicking within this pane brings you to the license management dialog, which is described here License Properties.
8 Modifying the User Interface
Note
This section is only applicable if you have super user
privileges on the camera.
The Plate-i web server allows you to modify some aspects of the user interface design. Once you login as super user, you get access to the UI Design menu of the camera with the two sub-menus Style, and Icons.
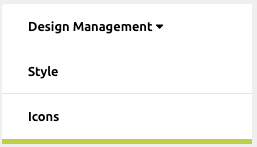
8.1 Style Change
The color schemes of the web page interface elements can be modified in the 'Style* sub-menu. A clicking inside the pane opens the color editor, where you can modify the color for each interface element separately.
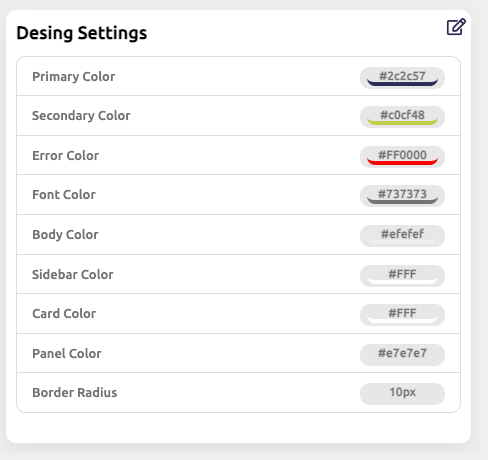
The color design is split into functional groups:
- Primary and secondary colors: The color of the page details such as buttons, table headers, and navigation.
- Error color: The color of error status visualizations.
- Font color: The color of the text elements.
- Body color: The color of the body background.
- Sidebar color: The color of the navigation sidebar.
- Card color: The color of the background of UI cards.
- Panel color: Color of the panels contained in the access and settings pages.
- Border Radius: The radius of corners drawn for various design elements.
The colors can be edited by clicking into the numeric field of each element. A pop-up editor provides a color picker for color values, respective a numeric input for the border radius.
Changes you make are immediately visible in the live user interface.
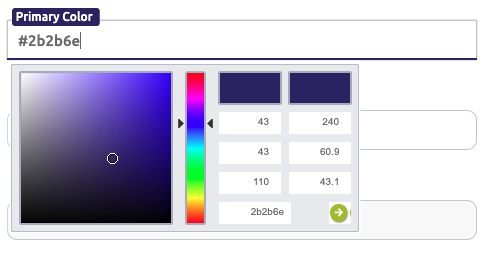
Click on the to permanently save changes.
Note
In order to activate the changes, the cache of your browser must be cleared and the page reloaded.
The Reset to default values button  can be used to revert the
UI back to factory settings. Do not forget to clear the browser cache after
reset of the style elements!
can be used to revert the
UI back to factory settings. Do not forget to clear the browser cache after
reset of the style elements!
Use  to exit the UI design page without saving.
8.2 Icon change
Each icon of the Plate-i web interface can be replaced with a custom version.
By clicking on any of the icons, a dialog window pops up with the options for icon replacement. You can choose to upload a new icon image or to reset it to the default version.
After changing the icon, a message dialog window with the notification about the status of the changes will pop up.
Note
In order to activate the changes, the cache of your browser must be cleared and the page reloaded.
9 Safety checks during camera boot procedure
Several checks and safety measures integrated into the camera, so that in the case of data corruption access to the camera is still possible.
Those checks are run as part of the boot process and server startup of the camera.
9.1 IP Address Configuration Check
The camera makes a sanity check of the network configuration during reboot (power on) and server restart. If the network configuration is not valid or empty, the configuration will be reset to factory defaults. This will enable you to get access the camera under the factory default IP address.
Note that the ANPR settings will not be modified.
9.2 Server Configuration Check
The camera makes a sanity check of the ANPR server configuration every time at which the server is restarted. If the configuration is empty, or seems to be obviously invalid, it will be reset to default values.
An invalid server configuration may be created for example when the camera suddenly loses power. In this case it may happen that configuration files are not written properly to the internal flash memory.
10 Placeholders for naming patterns
This section describes all the special keywords which can be used as placeholders in text used within actions. See Actions for a description of actions and their use.
During the creation of a message as a part of an action, placeholders will be replaced with their respective dynamic values.
Note that some special characters like ',' are used internally by CARRIDA. Those characters also need to be replaced by special placeholders within an action message - this is done automatically by the user interface.
Only within message definitions in the REST API of the camera it is necessary to use the placeholder strings.
| Placeholder | Description |
| %LP% | License plate text. |
| %LP_WS% | License plate text including white spaces. |
| %LP_UL% | License plate text including white spaces which are represented as '_' character. |
| %LP_HASH% | The license plate SHA256 hashed string as hexadecimal number. No white spaces are considered for the hash computation. |
| %LP_HASH_WS% | The license plate SHA256 hashed string as hexadecimal number. White spaces are considered for the hash computation. |
| %STATE% | State/country string. |
| %STATE_FULL% | Full state name. |
| %STATE_ALPHA_3% | The ISO 3166-1 alpha-3 country code. |
| %CONF% | Confidence value for this LP. |
| %CONF_STATE% | State/country recognition confidence value. |
| %NUM_ROWS% | The count of detected rows of the license plate. |
| %REGION% | The region string (if available), e.g. example: "Bayern". |
| %REGION_CITY% | The city string (if available), e.g. "Munich" . |
| %REGION_SHORT% | The region abbreviation, e.g. "M". |
| %ENDING% | The LP type/function (if available), e.g. "Taxi", "Feuerwehr". |
| %ENDING_SHORT% | The LP type/function abbreviation (if available), e.g. "TX". |
| %COL_PLATE% | The color of the plate as a string. |
| %COL_CHARS% | The color of characters of the license plate text as string. |
| %COL_PLATE% | This keyword will be replaced by the color of the plate as a string. |
| %COL_CHARS% | This keyword will be replaced by the color of characters as a string. |
| %POS_X% | The X position of the left upper corner in the image. |
| %POS_Y% | The Y position of the left upper corner in the image. |
| %POS_W% | The width of the license plate in pixels. |
| %POS_H% | The height of the license plate in pixels. |
| %MODEL% | Note: only on supported CARRIDA edge devices The recognized Model type of the vehicle. |
| %MAKE% | Note: only on supported CARRIDA edge devices The recognized Maker brand of the vehicle. |
| %MM_CONF% | Note: only on supported CARRIDA edge devices The confidence of Make&Model recognition. |
| %VEHICLE_CLASS% | Note: only on supported CARRIDA edge devices The recognized vehicle class. |
| %VEHICLE_CONF% | Note: only on supported CARRIDA edge devices The confidence of vehicle type recognition. |
| %VEHICLE_COLOR% | Note: only on supported CARRIDA edge devices The recognized vehicle color. |
| %VEHICLE_COLOR_CONF% | Note: only on supported CARRIDA edge devices The confidence of vehicle color recognition. |
| %VEHICLE_VIEW% | Note: only on supported CARRIDA edge devices The recognized viewing angle onto the vehicle (front/back). |
| %VEHICLE_VIEW_CONF% | Note: only on supported CARRIDA edge devices The confidence of vehicle view recognition. |
| %YEAR% | The year - date/time of detection. |
| %MONTH% | The month - date/time of detection. |
| %DAY% | The day - date/time of detection. |
| %HOUR% | The hour - date/time of detection. |
| %MINUTE% | The minute - date/time of detection. |
| %SECOND% | The second - date/time of detection. |
| %FRACSEC% | The fractional second - date/time of detection. |
| %CR% | The carriage return character code. |
| %LF% | The line feed character code. |
| %COMMA% | This keyword will be replaced by a ','. |
| %BR_ON% | This keyword will be replaced by a '('. |
| %BR_OFF% | This keyword will be replaced by a ')'. |
| %SQ_BR_ON% | This keyword will be replaced by a '['. |
| %SQ_BR_OFF% | This keyword will be replaced by a ']'. |
| %EQUALS% | This keyword will be replaced by a '='. |
| %AND% | This keyword will be replaced by a '&'. |
| %FULL_IMG% | The base64 encoded full image string - this can become large. |
| "%LP_IMG% | The base64 encoded cropped LP image string. |
| %REL_IMG_<w>_<h>_<p>% | The base64 encoded image cropped relative to the full image size and resized to defined output size. <w> should be replaced with the output image width (in pixels), <h> with the output image height and <p> should be replaced with the with the cropping percentage (0 < <p> <= 100). |
| %REL_LP_<w>_<h>_<p>% | The base64 encoded image cropped relative to the LP image size and resized to defined output size. <w> should be replaced with the output image width (in pixels), <h> with the output image height and <p> should be replaced with the with the cropping percentage (100 < <p>). |
| %FULL_OV% | The base64 encoded full overview image string. |
| %REL_OV_<w>_<h>_<p>% | The base64 encoded overview image cropped relative to the overview image size and resized to define output size. <w> should be replaced with the output image width (in pixels), <h> with the output image height and <p> should be replaced with the with the cropping percentage (100 < <p>). |
| %AREA_INDEXES% | The comma separated list of indices of areas where the plate was detected. |
| %AREA_NAMES% | The comma separated list of area names, where the plate was detected. |
| %ANGLE% | The motion direction of the vehicle in degrees. The direction is counted clockwise. |
| %DISTANCE_CHANGE% | This keyword will be replaced by the following string: "0" ... The vehicle is static. "1" ... The vehicle is approaching. "2" ... The vehicle is leaving. |
| Placeholder for the REST API Description | |
| %COMMA% | This keyword will be replaced by a ','. |
| %BR_ON% | This keyword will be replaced by a '('. |
| %BR_OFF% | This keyword will be replaced by a ')'. |
| %SQ_BR_ON% | This keyword will be replaced by a '['. |
| %SQ_BR_OFF% | This keyword will be replaced by a ']'. |
| %EQUALS% | This keyword will be replaced by a '='. |
| %AND% | This keyword will be replaced by a '&'. |
| %CR% | This keyword will be replaced by a carriage return. |
| %LF% | This keyword will be replaced by a linefeed. |
| Example: | The camera has detected a German plate "TEST123" on 01.01.2017, at 10:15:20. You can form a naming pattern as follows: License plate value: %LP% from %STATE% The result will become: License plate value: TEST123 from DE or plate_%HOUR%_%MINUTE%_%SECOND%.jpg This will be displayed as : plate_10_15_20.jpg |
|---|
10.1 Automatic replacement of special characters in Action texts
Some special characters are automatically replaced internally with a placeholder representation. Those characters can be freely used within actions texts:
, ( ) [ ] = &
use the following placeholder sequence for
<carriage return, ASCII code 13>: %CR%
<linefeed,ASCII code 10>: %LF%
11 Regular Expressions
Regular expressions are used to conveniently define patterns for groups of license plate strings. You can use regular expressions when you enter list entries manually, or within imported text files.
Note
If you turn on the 'Use Regex' Switch in the dialog box, the '!' will automatically be prepended to the string for you.
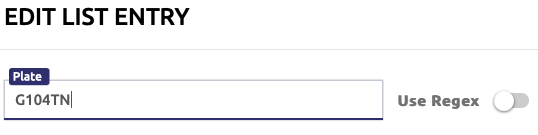
CARRIDA uses a powerful set of regular expressions, of which the most important details are described in the following paragraphs.
Note
In CARRIDA regular expressions, all characters match themselves (example: A is always A, B matches B, etc.) except for some special characters. If you want one string only to match, directly use it as the regular expression.
Exempt are the following special characters:
.
[]
{}
*
+
?
The '.' character matches every single character. E.g. the regular expression
G.23456
will match
G123456, or
GU23456, etc.
(In the above expression, the "." is matched by 1 or U respectively)
A character range is defined by a list of characters enclosed in []. For example [A-D] will match any single character in the range 'A' to 'D'. This character range may also be defined as [ABCD].
An atom is defined as a character or character range.
A single atom can be repeated with the * , +, ?, and {} operators.
The * operator will match the preceding atom zero or more times. For example, the expression
A*B
will match any of the following:
B
AB
AAAAAAAAAB
or the expression
A[BC]*D
will match
AD
ABCD
ACCCBBD
(between A and D, the characters B and C as defined by the atom [BC] may be repeated any number of times.
Hint
A regular expression beginning with a * is invalid because the * operator
does not precede any other atom. Use the combination .* instead!
The + operator will match the preceding atom one or more times. For example, the expression
A+B
will match any of the following:
AB
AAAAAAAAB
But will not match:
B
The ? operator will match the preceding atom zero or one time. For example, the expression CA?B will match any of the following:
CB
CAB
But will not match:
CAAB
An atom can also be repeated with a bounded repeat, where the number of allowed repeats is defined as part of the regular expression:
A{n} Matches 'A' repeated exactly n times.
A{n,} Matches 'A' repeated n or more times.
A{n, m} Matches 'A' repeated between n and m times inclusive.
For example:
A{2,3}
Will match either of:
AA
AAA
But neither of:
A
AAAA
| Example: | To match any license plate string of at least length 1: .+ Match license plate strings which consist of digits only: [0-9]+ Match all taxis, under the assumption that taxis have a license plate string that ends with TX: .+TX Match all license plates that start with a letter and end with a digit: [A-Z]+.*[0-9]+ Match all license plates from the CARRIDA company, assuming that their license plates consist of a CAR string and a following 3 number digit (like CAR001):
CAR[0-9]{3}
|
|---|
12 The Plate-i IO Interface
The plate-i camera provides several interfaces which are used for power supply, networking and signaling.
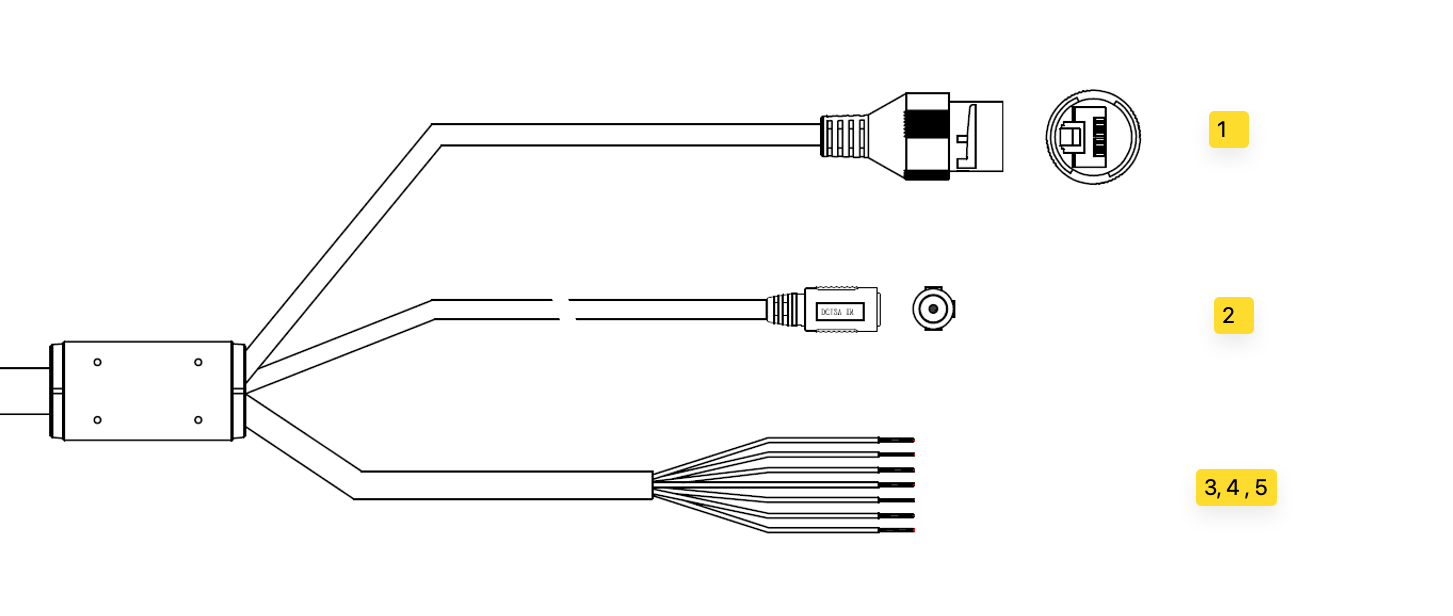
The following table lists the available IO connections:
| Signal Type | Color | Description | |
|---|---|---|---|
| 1 | Network Interface | N/A | RJ45 Network port. PoE enabled. |
| 2 | Power Supply | N/A | Cinch connector. DC 12 V (9.0-15.0 V), 10 W. |
| 3 | Alarm OUT | Yellow | Output line. Can be used in Actions as output signal. Max Load 40 V, 300 mW, 300 mA. |
| 3 | Alarm IN | Blue | Input signal. Can be used as trigger line. TTL, 3-5 V DC. |
| 3 | Alarm GND | Purple | Alarm GND line. use with Alarm IN to provide an input trigger signal. |
| 3 | COM GND Line | Green | Common ground. Connect with Alarm Out for external signaling. |
| 5 | RS485 A | Orange | Optional, depending on Plate-i model |
| 5 | RS485 B | Red | Optional, depending on Plate-i model |
| 5 | RS485 GND | Brown | Optional, depending on Plate-i model |
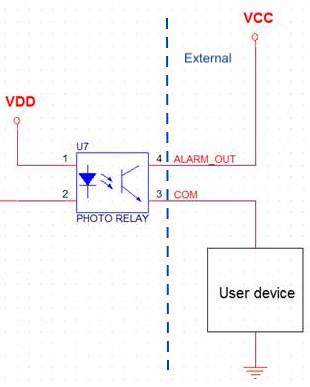
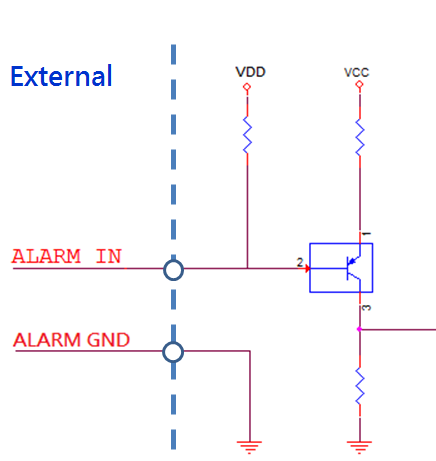
13 CARRIDA Software Release Notes
13.1 CARRIDA Edge 4.9.0
General Improvements
This release is a big update with many changes to the WebUI, performance optimizations and internal re-structuring of modules.
- Add RTSP overlay text option to the RTSP configuration at Plate-i. (Plate-i only).
- Add new entry to the CARRIDA results and as placeholder that includes hash string of of the plate value with white spaces.
- Add offline licensing as option.
- Show camera serial on Dragon+ cameras.
- Implement the option to fetch text results via REST API call filtered by the matched access lists.
- Issues in REST API have been resolved for /text/results, /export/results, /system/confg.
- Log plates that are removed from the lists. Make this log available only in debug mode.
- Add a direction arrow to the plate visualization.
- The new SDK features for vehicle view (front/rear), vehicle color, and exact plate position are integrated into the WebGUI components and available on supported systems.
- Calculate count of allowed maximum saturated/minimum correct pixels relative to the image size instead of relative to ROI size.
- Replace '_' with ' ' in Region visualization.
- The use of the term 'classifier' is replaced by using the better term 'region'.
Bugfixes
- Umlaut is correctly encoded in UTF-8 depending on flags in placeholder string.
- Replace '/' and other not allowed characters in filename strings used in actions (store, ftp...).
- The logo of the login dialog window can now be changed.
- Prevent saving NTP properties if NTP server is empty.
- Prevent usage of same IO line for start and stop trigger signal.
WebGUI
- The Home Page has been removed.
- Redesign of Buttons, Dialogs and Window layout.
- Add flag to the actions that allows to enable/disable overlay drawing on cropped images. Available in store and ftpupload action.
- Redesign of the Textresult table and the Textresult page. Textresult has been renamed to Detection History.
- The Settings Submenus can all be collapsed now.
- The Actions Menu has been redesigned to improve the overview and usability.
- redesign of the configuration menu.
- Display additional features of current classifier, if there are any listed in classifier info.
- Display value string instead of number in notification message when changing values from Pull down menu display info on the images that is used for defined actions.us etc.
- All menu texts, dialog texts and additional texts in the WebGUI have been checked, rewritten. Translation to German and French have been checked and rewritten.
- Better visualization of motion detection events and data.
- Display info on the images that is used for defined actions, info is also displayed on cropped images now.
- The LowRes option in the camera settings has been removed.
- The statistic display now shows a horizontal timeline of detection times.
- The information display at the top of the website has been enhanced.
- The system menu has been redesigned, some items renamed.
CARRIDA 4.9.0/4.9.1 SDK
- Vehicle color classification added.
- Parameters to query individual license fields added.
- SaveMemory parameter optimization - can be switched on if RAM usage is critical.
- Software license key format update - older licenses must be updated to use this SDK version.
- General improvements of the recognition performance and speed.
- Ultimate reading mode added - the best possible recognition quality (slower).
- Update for GULF - category field can be distinguished from the main license plate string.
- Argentina support added.
- Improvements for UAE and Switzerland.
13.3 CARRIDA Edge 4.8.1.2
General Improvements
- The resolution settings have been removed in the camera menu. The camera uses always high resolution.
This is the first release for the Plate-i devices, based on CARRIDA Edge 4.8.1.
Bugfixes
- Network settings have been improved for DHCP.
13.4 CARRIDA Edge 4.8.1
General Improvements
- Logging has been improved.
- General performance improvements
- Corrected order of licenseplate characters in plate result value field for arabic plates.
- Added Stop On Detection flag that can be used in timeout trigger mode.
Bugfixes
- [CRITICAL] Heat map calculation corrected in the case of plates that are detected at the image border.
- Factory reset improved.
- Visualisation of detection areas improved.
- Configuration of export and logs downloading dialog visualisation improved.
- VEHICLE_CLASS placeholder corrected in the Tag Suggestions dialog.
- HTTP HMAC action editing corrected.
- fps read visualisation in trigger mode corrected.
WebGUI
- Extended statistic visualisation added (charts for basic camera settings for the range of up to one week can be displayed).
- Action testing timeout added. (Testing of not correctly defined actions is stopped after 20 seconds).
- Start-Sequence trigger mode removed.
- Access lists visualisation improved.
CARRIDA 4.7.1 SDK
- Improvements in plate filtering algorithm.
- Improvements (both runtime and recogntion performance) of the vehicle classification algorithm.
- New draw options flags (vehicle class, position, confidence).
- Updates of Germany regions database.
- General improvements of the recognition performance.
13.5 CARRIDA Edge 4.8.0
CARRIDA Edge version 4.8.0 is a release with major additions to the functionality of the camera interface, in addition the CARRIDA SDK 4.7.0 has received some significant updates and improvements.
Bug Fixes
- Server Improvements The anpr server has been made more reliable and robust.
- v4l2 camera handling has been improved.
General Improvements
- Vehicle classification can be computed if it is supported by the classifier. Contact CARRIDA for more information and new classifiers.
- MQTT publishing has been added with support of all MQTT publishing features. You may configure one ore more MQTT servers to which you can publish results and images.
- FTP actions can optionally use public key authentication now.
- HTTP actions now support optional certificate based authentication.
- REST API functions have been added to include all new parameters and functions of this release, specifically statistical information can be retrieved now.
WebGUI
- Apply buttons have been removed in all pages wherever possible. A new value is stored by the interface as soon as you type or click it, making the process to configure parameters much more efficient and faster.
- New parameters have been added: Enhanced detection, Advanced state classification, Main country(-ies), Plate verification, Distance change.
- Visualization of results and confidences has been improved. A new design for the display of results has been created.
- The Camera types configuration has been re-organized and improved.
- The visualization of state recognition has been improved.
- The INI Editor can now add new parameters.
- Statistics of the edge device operation and other useful information is now displayed in the WebGUI. Future releases will add more parameters.
CARRIDA 4.7.0 SDK
- Plate verification feature added for a better suppression of unwanted readings.
- The exact license plate position can be provided now. The exact corners of a license plate are computed and stored at the cost of slightly higher computing times.
- Main state(s) can be optionally defined - this state and its neighbors will have higher priority for state-recognition.
- Significant improvements in state recognition for USA and Canada.
- Faster processing in stream modes.
- New parameter SortResults introduced (see documentation of CARRIDA parameters), can be used to reduce latencies for the fastest readout possible.
- Distance_change_type option added (differentiate between approaching/leaving/static vehicles). Detects if a license plate is approach or leaving the camera, based on size changes of the detected license plate.
- Hashing of a license plate string is possible to guarantee anonymity of readings. A hashed string can be used in actions to transmit and store license plates.
- Optimizations in the handling of ANPR readings which are located close to the ROI border(s).
13.6 CARRIDA Edge 4.7.0
CARRIDA version 4.7.0 is a release with major additions to the functionality of the camera.
Bug Fixes
- Factory Reset bug Running a Factory Reset (or import with Import Classifier selected) causes UI to freeze (temporarily) and factory reset is not performed.
- Logs download bug Larger log files could cause the error while downloading logs. This bug didn't occur as long as log files don't reach critical size.
- Result REST API call An error in text results filtering caused return of empty lists
General Improvements
- 3 digit country code CARRIDA can handle ISO 3166-1 alpha-3 country codes in addition
to currently used 2-digit country codes.
New country code is also added as:
- a placeholder for actions
- a field in the JSON output.
WebGUI
Test action button Implement a test functionality for actions. Every action dialog contains a test button so that the action can be dry-run without real event.
Access List upload extend option Add option to select if the list should be replaced or extended while uploading new list file.
Tooling functions Added a modal dialog that contains interface to run following terminal tools:
- traceroute
- ping
- ip info
Draw confidences on/off feature The drawing of confidences in the visualization of license plates is now optional. It can be switched on/off using a parameter in Display Information section.
Access list filter for text results Added a filter option to display text results that have been matched to the access lists at the time of reading.
Timed actions New type of actions which are triggered by a timer. Actions are defined with 2 additional parameters:
- start time (hh:mm:ss) - time of the day which defines the time of first run of the action
- running interval (hh:mm:ss) - interval that defines time span between two sequential runs of the defined actions.
NTP status NTP status is shown on Configuration page if NTP is enabled.
CARRIDA 4.6.0 SDK
- fast vehicle classification implemented - vehicle class (motorcycle, car, van, camera, truck, bus) and vehicle brand (e.g. Opel Astra)
- Country Alpha-3 code added as part of license plate output
- improvements for UAE - state recognition, color detection
- General improvements of the recognition performance
REST API
Add SSL Features to REST API The REST API needs to be expanded so that the new webGUI SSL features can be used using REST:
- upload keys, certificates
- enable/disable SSL
Statistic API endpoint There is an endpoint added to the API server. It can be used to obtain statistics as json object. That object contains detections count, characters heights and heatmap. Each of this statistics part can also be obtained separately.
Make and Model On certain devices available. In the case that make and model detection is enabled, related entries are added to the result tables (live and text), to the json struct in the rest API and new placeholders are also available in the action fields.
13.7 CARRIDA Edge 4.6.1
Bug Fixes
Several Bugs have been corrected in this release:
Corrected bug which did not properly display the direction indicator of the ANPR engine page in Firefox.
Corrected a bug in the REST API, set parameter works now:
- min_gain, max_gain, min_shutter, max_shutter
- lowConflimit
- MinLetterHeight, MaxLetterHeight
General Improvements
Several checks and safety measures are now integrated into the camera, so that in the case of data corruption access to a camera is still possible.
- Addition of the check for a DIO reset signal during the first seconds of a camera boot If a reset input sequence is detected, the network interface of the camera is reset to default values.
- The camera makes a sanity check of the IP configuration during boot and server restart. If the IP config is not valid or empty, the IP configuration will be reset to factory defaults.
- The camera makes a sanity check of the anpr server configuration. If the configuration is empty or seems to be invalid, it will be reset to default values. This does NOT affect the network configuration.
CARRIDA Engine 4.5.2
- General improvements of the recognition performance.
- The handling of wide characters like 'M' or 'W' has been improved.
- FilterNonPlates parameter added to better suppress unwanted readings.
- Bugfix for UAE (a letter must always precede digits).
- The engine is now initialized quicker.
- Reliability of the confidence output has been improved.
WebGUI 4.6.1
- Opening a specific GUI site on the camera (e.g. 192.168.13.23/configPage) will open this page after the login dialog. Calling the camera IP without a subpage target will open the home screen.
- Added a button to reset the live statistics on the live page.
- An IO trigger option is only available if an input line is configured on the camera.
- NoReadEvents are now stored and displayed very similar to the other text results.
- The top of the GUI window shows additional info.
- In the settings menu, drawn polygons (brightness control and ANPR region) can be moved by pressing ctrl and dragging a corner with the mouse.
REST API
- Bug fixes.
13.8 CARRIDA Edge 4.6.0
Bug Fixes
Several Bugs have been corrected in this release:
- The syncing of the ANPR ROI and Brightness ROI works now correctly, even if one of those areas is not defined.
- Actually run a no read action in trigger mode when there was no plate detected during the active reading phase.
- A freezing screen while loading no read logs has been solved.
- Bug in visualization of the matched lists in text result page. The matching was performed, but not displayed correctly.
- problems in the web UI when editing UTF-8 plate entries.
- Bug in REST call in*/properties/roi* which created an internal server error as response.
- Import design settings was not working smoothly. Progress bar was not shown, button stayed disabled after import.
- When editing a list entry. the Save button in the dialog was not disabled, thereby preventing further editing of the affected list without a manual page refresh.
- Editing of ROIS in Settings: ensure that each new point added by double-click is within the image area.
SDK 4.5.1
The CARRIDA Engine has been improved and enhanced to deliver more performance and accuracy.
- A noticeable performance improvement, you can expect up to 20% faster reading. rate at an even higher reading accuracy.
- Vehicle classification functionality added.
- Plate_finished field added to License_plate structure.
- Average frame rate fields added to LPR_Result structure.
- Reading rate improvements for UAE and New Zealand.
- Optimizations in memory handling and parallelization pipeline.
- Best mode added (even better than best).
- Reading improvements for 2-rows plates - mainly Germany.
- Recognition of Swiss cantons added.
- Reading quality improvements for stacked characters.
WebGUI
The Web GUI of CARRIDA has received several enhancements:
- Design improvements of interface elements and layout.
- The download of log files now loads all log files, including the log files which are part of the log rotation process (file.log.1, file.log.2, etc.).
- Added Possibility to enable/disable SSL as well as upload a new SSL certificate and key to the camera.
- The HTTP server listens on the port 80 and automatically redirects to HTTPS if SSL is used in web UI.
- Show status or bash output while installing SW update via UI.
- Add separate flags for import of actions and lists.
- An editor for the low level configuration has been added. This can only be opened by the camera SuperUser.
- The Web GUI is now logging all user actions in GUI.
- Added new min/max/avg character height of detected plates info in live view.
- Added new Count of correct/wrong direction readings info in live view.
- Added new Heatmap display of license plate detections as overlay on the live view.
- Improve visualization of Accepted Character Height graphic in Settings. Make the graphic interactive so that user can change minimum and maximum accepted character height parameters directly in the visualization.
- Display processing frame-rate for the last 1, 10 seconds, and since last reboot.
REST API
- Added ROI to the overview camera parameter.
A list of abbreviations used throughout this document
- ANPR
- Automatic License Plate Reader.
- ARM64
- Stands for processors with the v8 AARCH 64-bit instruction set.
- ARM
- Stands for processors with the v7 ARM 32-bit instruction set.
- dB
- Decibel, used to describe a relative sensitivity (gain) value in cameras.
- fps
- Frames per second.
- FOV
- Field of view.
- HW
- Hardware.
- LP
- License Plate.
- mA
- Milli-Ampere, one 1/1000 th of an ampere.
- ms
- Millisecond, one 1/1000 th of a second.
- PC
- Personal Computer.
- PK
- Product Key (for software licensing).
- px
- Pixel. The smallest unit of resolution in an image. For example, VGA images are made up of 640x480 pixels.
- ROI
- Region of Interest, typically a marked area in an image.
- SDK
- Software Development Kit.
- SW
- Software.
- x86
- Stands for Processor Architectures with the Intel instruction set. 32-bit hardware.
- x86_64
- Stands for Processor Architectures with the Intel instruction set. 64-bit hardware.
- VC
- Vision Components GmbH.
- OSD
- On-screen display
Image symbols used in this document
| Symbol | Meaning |
|---|---|
|
Points to especially important aspects of the manual or the software. |
|
The lightbulb highlights the hints and the ideas that may be helpful. |
|
This warning sign alerts of possible pitfalls to avoid. Please pay careful attention to sections marked with this sign. |